Tuesday, June 26, 2012

Homemade texture paste

If you are like me you would like to have all kinds of arty goodness in the house but sometimes funds aren't always available or you could use the money for more important things like food or clothing. 
I am going to show you something I just made myself. I tried to research it a bit on the web but didn't find anything that I already had on hand to make what I wanted. 
Texture paste.
I did recently buy some texture paste but it was on sale and had it not been I would have gone without. If I can make it I will and when my tube runs out, I will be using this great paste. I already have and I am about to show you how to make it and how to apply it.
Here is what you need: 
a plastic container to mix and mixing stick, old spoon, popsicle stick or skewer
white acylic paint
glue, does not have to be Aleene's, cheap white school glue is fine and 
baking soda...yes I said soda
You may need a couple drops of water but I will explain this later

 In mixing bowl pour some baking soda in , I didn't measure but I probably used a quarter of a cup or 50ml, enough to use for a few projects.
Add white glue and squirt a good amount in about 2 tablespoons or 30 ml. Then add paint and squirt in some paint and start mixing, if it is too runny add a bit more soda, if it is sort of on the dry side and a thick and hard to mix then add more white paint. Stir until is is not runny but on the thick side. If you need to you can add a couple small drops of water and I mean small at a time to get it to a good consistency. Mine is like a thick icing.
 Now the fun part. I have a stencil I have made from a Tim Holtz flourish die that I use on my canvases. I use the negative part. These are great. Now lay down your stencil, you can use whatever you have on hand, if yours are plastic remember to clean them well after you are done with water. Make sure your stencil is flat to the surface tape down if necessary. Then with your mixing stick or palette knife spread the texture medium over the stencil, you can spread it thin or if you want chunky texture spread it and make sure you get the whole area you want covered.
 Here is what it looks like and I made it nice and neat for you to see.
 Now lift the stencil and you can see the wonderful texture that is created by these 3 ingredients, well 4 if you added water. Neat huh? Let it dry completely and I tell you the day I did this was hot and humid and it took no time at all to dry.Once dry you can paint over and around it. If you make a bit of a mess on the outside where the stencil was just take a damp cloth or Q-tip and clean up areas but it just adds to the background. 
 Here is the other end of the canvas where I did some circles, added some purple to the background and went over the texture with paint as well. And you can sand this if you paint over it and want some white to show through the painted areas. Just remember you need that glue as it binds the soda together, if not it will flake off easily.
Make sure you have a good tight fitting lid for your container to cover your texture til the next time you use it. If it is a little on the dry side, add a couple drops of water and not too much.
For bling after you paint your canvas and the texture you could add some Stickles or glitter glue to add some interest or spray with inks. Just try and see and let me know what works best for you. 
So there you have it. Faux or poor man's texture medium or whatever you want to call it. Fast, inexpensive, and so creative.
If you blog about this please remember to link back to me and give me credit. That's all I ask.
If you do projects using this recipe let me know and I would love to hear your feedback and see what you have created with this. 
Thanks for dropping by and just be creative and have fun doing it.

Monday, June 25, 2012

Summer of Colour 2 Week 3-Baseball Nut

Sounds yummy doesn't it? Well Kristin has done it again with the flavour or colours of this next week. Here is a peeky at what the colours look like together in an ice cream cone....
Baseball Nut
"A smooth, vanilla flavored ice cream swirled with a black raspberry ribbon and loaded with cashews"
-Baskin Robbins


 And here is my girl wearing her raspberry beret with cashew hair and swirly raspberry and vanilla background done in watercolours, acrylic paint and paper. 
Her dress looks more purple here but it is more of a black raspberry and I gessoed over it a bit to tone it down. I used my fingers to paint the watercolour background with my new watercolour crayons. 

Next week's prompt is Strawberry Lemonade Punch....oooo can't wait to do something with these colours. 
Thanks for dropping by. Don't forget to go to Kristin's blog to check out all the links to those who are participating in this wonderful colour challenge. You will be amazed at the beautiful artwork that is around the web.
Til next time......I have a wonderful frugal art technique to show you....you will want to make some and try it out yourself. I will be supplying a recipe and you more than likely have all the ingredients, all 3 of them. 
TTFN

Saturday, June 23, 2012

canvas and texture

Hi there everyone. The humidity has finally lifted at least for now but it is still quite warm during the day and cooler in the evenings.Phew it was a warm one.
I finally got 2 small canvas boards completed after deliberating and fussing with these. 
Remember my sketch Roxy? sister of Gracie who took off on an adventure? 
Well Roxy is now put to canvas and I just love how she turned out. As much as I enjoy the colour I do like pencil sketches, bu,t when the girls have colour added to them they seem to take on a personality. 
I recently found out Gracie is in Australia and moved in with Jenny. Jenny said she arrived unexpectedly and decided to stay with Jenny. I do hope Jenny has room and is OK with it. I thought it awfully bold of Gracie to think you go somewhere and just move in? 
Anyways I heard rumblings Roxy may be taking a trip but hasn't decided where yet. Golly these girls are sketches one day then have incredible attitudes the next. I was not brought up that way Hmmm
 I cut a larger canvas to make skinny canvases as they are difficult to find and they are so portable as well. I applied several layers of cut papers, gessoed and painted and stenciled over them. Then I added turquoise and lime green paint and blended. Roxie is a mix of pencil crayons, and paint, paper dress and bows in her hair and a bit of lace. Below is a picture of texture medium I got on sale at Michaels. The cap was sort of broken so I taped it town and I just have to twist it off, the top was sealed at first so the medium itself was really good. I took a close up so you can see how I used a stencil and applied a thin layer of texture paste, it didn't take very long to dry either. I didn't add paint over top of the texture as I wanted the white to sort of stand out a bit. This was a lot of fun. I am still getting used to using Prisma Colour pencils and doing faces but each one gets better as I go and I am learning so much about this type of portrait. 
 And this canvas was a redo. I had done this same girl on a canvas and I put beeswax to her as instructed in Suzi's Mixed Media girls and her face disappeared. So I decided  to only use gel medium for now til I get used to the application of beeswax and how much to use, or maybe I didn't have enough pencil crayon colour  on her face.??? This redo is much better anyways and I added a nice quote and more texture paste. 
.Well we just got home from an evening ride on the motorcycle and it was quite nice. Traffic was quiet and we stopped and had a Tim Horton's coffee in a little town not far away. 
Til next time, take care and I always love hearing from you.


Wednesday, June 20, 2012

Hot Humid and sketchyl

Well the title says it all. Today is a real scorcher, almost 40 Celsius and 98 F, needless to say hot hot hot. We haven't put the window rattler in, hubs is working evenings and doesn't get up til later in the mornings So I have been trying to keep cool but it has been a little too warm from my liking.
I have been working on next weeks Summer of Colour and it is coming along quite nicely. Not sure how I am going to work a touch of cashew colour in yet but I will figure something out.
Anyways I have been doing more whimsy girl sketches and although it is nice to see them in colour, I am really enjoying the sketch stage. I found some tortillons or paper stumps to blend my sketches and I love them. They truly transform a simple flat sketch into something a little softer and more realistic.
These are just a few sketches that have come to life in the last week or so, I have a couple more but they aren't quite finished and a little less favourable. 
I am working on some characters to put on canvas boards and have so many ideas and another idea I will keep a secret til I can get at it and show you my newest idea, maybe a selling feature this fall for my craft shows.
Anyways here are 3 sketches, thanks for looking and keep cool and remember your pets too, they get heated up so make sure they stay cool and have plenty of water. 


 These girls haven't been shaded yet. They just make me smile and I hope they make you too!

♥♥♥

Monday, June 18, 2012

Summer of Colour Week 2

So last week I did  a butterfly but didn't plan on that because I was unsure as to whether I would do the challenge or not, but, after seeing so many of my blog friends joining in. I jumped in full tilt. 
From here on as a practise and a challenge with colour I am making a mini journal with faces of each week's colour prompts from Kristin's SOC 2 Challenge.

So here is week 2's flavour- Mint Chocolate. 
This colour looks more blue to me but I used greens in my piece as mint is green and not blue. I hope everyone else is recognizing the colour as I do.
 If not then I must be coloured blind. Here is my take on this weeks prompt. I painted this watercolour paper with all acrylics, layers of homemade stencils and gesso with Bittersweet chocolate Delta acrylic and Americana Hauser light and medium greens. I didn't have any small flowers in my stash so I used a die and cut my own then painted them, I put polka dots on them, loving dots lately, I even used alcohol ink on a pearl embelly on the center of the green flower. And if you look close enough you may see a little cone hanging in her hair. 
I have been trying to visit the artists doing this challenge, I hope I can stop by most of them for a visit and see their takes on this event. 
Thanks again Kristin for a wonderful and playful time over at SOC 2.
TTFN ♥

Saturday, June 16, 2012

Life quote canvas

Today I had a bit of time to finish up this canvas that started out a totally different colour, thanks to gesso I was able to cover all the paint layers up to make a new background. I have been playing a lot with layering with paint and making my own stencils to produce some pleasing and interesting visual appeal. 

Just a tip for all of you, to make your own stencils just use a light weight card stock or even cracker box chipboard, use your die cuts and cut out shapes in your Cuttlebug or Big Shot or whatever you use. 
Use the piece that you are about to throw out and use that as a stencil. I also use various round punches and punch designs using various sizes to make patterns. Cut shapes from fun foam or again use your die cut and cut flower shapes, stars whatever you have. I have a stack of different things now to use. Some of them get a little worn out if you use too lightweight of card stock, but, you can always make another. 
I even used Tim Holt's flourish die and they make wonderful stencils. Just take a peek at my background and see what you can find. You can even use corrugated cardboard, swipe some paint across the ripples and press onto your canvas, so many neat ideas all ready at your finger tips. Oh and one more. Look at doilies and see if there are sections you can use to stencil onto your backgrounds. I had some heart doilies and I saw an interesting medallion and cut it out. Take your stencilling to new heights, see what you already have instead of investing a ton on more stuff.

OK enough gibber. I was on Pinterest the other night, love Pinterest and I found some interesting quotes. I am not good when it comes to journaling and saying what I feel on paper, some things you wouldn't want to know or read. I can write letters and I can be diplomatic when it comes to expressing something I feel strongly about, but, I have never been good with words.
I saw this quote and thought it would be fitting for my little girl. 
So here she is, one of my Suzi inspired girls that I drew last week and could not wait to put her to canvas and make her come alive.
But first of all.......here is the quote.... 
 And here she is with her pouty lips, I haven't named her yet but I just adore her. I am so please with her except she has a bit of a crooked nose, oh well, it's all practise and I am really pleased how far I have come. I don't even draw my facial grid anymore. I just got the paper recently at Michaels, it has an oriental feel to it and so I cut some flowers from it and put them in her hair and added Stickles to them. 

The canvas board is painted in acrylics, the face is done in Prismacolour pencils.
Well I have another small one in the works. Thanks for dropping by and can't wait for Monday to reveal my Summer of Colour Week 2.

Friday, June 15, 2012

No help from my assistant

Hey there everyone
hope you are having a great Friday. It has been beautiful the last 2 days after much needed rain and it is warming up again. After a natural watering the garden is really coming along nicely. Can't wait for those green beans on my plate and tomatoes sun ripened right off the vine. Oh summer is almost here.

Well today I did a bit of creating, I decided to work on my 2nd week of the Summer of Colour. I had some trouble at times completing it because Rosie decided she wanted to paint as well. I told you before she isn't really a photogenic cat, I try to catch her straight on but she usually moves just as I am taking her pic. You can see here she is showing some attitude. I think she was trying to pretend she wasn't going to drink from the paint water, she tries when I am not looking and if I cover it she takes the cover off and has s drink. As you can see the paint and brushes are out and she got her whiskers painted, she loves when I do that. 
Needless to say I had to wait til she moved before I could settle into my chair which is to right where she is looking.
 Then after she got her whiskers painted at the spa she decided to settle in the sun at the other end of the table and take a nap. She wasn't snoring today but sometimes she makes quite a racket. She didn't know I caught her cat napping. Oh the life of a cat.....=^..^=
 And I completed this for the Summer of Colour week 2, Mint Chocolate but I am just showing you a sneak peek. Can't show you the whole thing til Monday...I painted everything you see, even the paper flowers. 
I also worked on a canvas today and it is coming along nicely.
Hope you all have a great weekend. 

Wednesday, June 13, 2012

The Summer of Colour 2

I debated on doing this challenge since I just finished the 29 Faces challenge but after visiting some of my blog friends I had to join in. The colours are really going to be spectacular and I am really into bright colours.
The basis of the Summer of Colour 2 is Ice Cream Inspiration. 
So I am one colour behind but it has to be posted by Monday and I know I can scramble something out by then. 
So the first weeks colour is.....Rainbow Sherbet. Our delightful Hostess Kristin is choosing a colour each week and we can make anything we like, cards. altered art, paintings etc but we must use the chosen flavour for that week. 
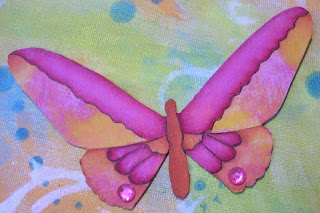
So here is my butterfly  I just blogged about in the post before  this one. I love the orange, pink and yellow combined. Just so yummy and you can feel summer in these colours.

Thanks Kristin for hosting another great Summer of Colour challenge and I can't wait to see more artists blogs and see what everyone is creating.
Take care everyone and thanks for dropping by.
You can still join in, just click the button on my side bar or click on Kristin's name and it will take where you need to go.

" I Never Saw Another Butterfly" Project


In an effort to remember the Children Lost, Holocaust Museum Houston is collecting 1.5 million handmade butterflies.
The butterflies will eventually comprise a breath-taking exhibition, currently scheduled for Spring 2014, for all to remember. The Museum has already collected an estimated 900,000 butterflies.

My blog friend Tee at The Altered Paper has all the information on her blog if you would like to join in on making 2D butterflies to remember those lost in the Holocaust.
Tee also has links on her blog for free templates for butterflies. 
Here is the direct link to the butterfly project if you are interested in sending on your own to the Museum in Houston Texas. 
Here are my two butterflies I will be sending to Tee. I may try to sneak in a couple more if time permits but June is really flying by.

 Both butterflies are not painted on the canvas the canvas is a backdrop only. The second butterfly will be in my next post for the Summer of Colour 2012.
Thanks for dropping by. 


Friday, June 8, 2012

hanging about

No pictures in this post but I have been keeping busy. Did I start my clean up...well not exactly.
I have some boxes waiting to be filled so it will be in the works very soon but I decided to get material to make some summer dresses since the shopping for one was a disaster a few weeks ago. I took apart a dress that is quite a fairly simple dress but I have worn it out. Literally there are holes in it and it was beyond repair. It is a great dress around the house when it gets hot and humid I wore it out, so I made a pattern from it. 
Anyways the sewing is going OK but I am a little out of practice and I am also working on a t-shirt type of material so it is very tricky to work with. I had thread trouble and then a few other malfunctions so this simple dress it turning into a real  nightmare. 
I have been making a few canvas bags since I take bags with me to do groceries and you can never have enough bags. I think I may be painting on some of them and selling them this fall if I still have the urge to sew after these dresses get done.For such a simple dress it is taking me way to long.
The veggie garden is really coming along now and so are the wonderful weeds we get inundated with every year. We have the worst weeds and every year it is thicker than ever but we try to do what we can to control them.
Well my friends. I  have been doing more sketches but want to paint and do canvases so I won't show them til they are done. One face is a huge fave of mine and hopefully I can find some time to work on it.
Thanks for dropping by and I will be back soon with pics.
Have a super weekend.
Related Posts Plugin for WordPress, Blogger...