Friday, March 19, 2010

Shaker ATC's

Well this week has been a never ending cleaning spree here. We had to do something with the basement and so it has been a daily project for the last week. The stuff one or two people accumulate in 20 years is amazing and is left forgotten, put away for a rainy day or whatever. So JB and I did a major clean up down there. Still some things to do but it is much easier to move around , we could even put a ballroom down there now......NOT.
We moved, wiped down, and there was a lot of dirty water, re-organized, donated, threw out and things are looking a lot better. Now to tackle the upstairs cupboards and closets which shouldn't take as long because we have very few of those things upstairs being a closet/cupboard challenged house.

So in the evenings while I was clearing the Lysol cobwebs from my brain I started making these shaker ATC's using slide mounts. Once I started I couldn't stop. Night after night I was making them and other cards and all of a sudden I have over 10 cards made of which 4 have already  been traded.
Here I will show you a few just to give you a bird's eye view of what I did.
Slide mounts are a little hard to come by these days with everything being digital so you might have to shop online for them as I did years ago and still hadn't used mine much til this week. But I may just have to order me some more.
Have a peek and I hope I can inspire you to make some shakers. Use bits and pieces of papers up and a few beads, cut outs, glitters and even a bit of rice to make yours then trade them.
Fried Rice, this is an image printed on Transparency for Inkjet printers, the shaker has gold beads and white rice inside. Hard to see here but if you click the image for a larger view you might be able to see it better. I took the prongs off the dragon fly as it was a brad and stuck it on with Glossy Accents.This card is already TRADED.


I called this card MARMALADE, not sure why it just came to me while I was looking at it completed. I dry embossed this card because I don't have any fancy embossing machines so I did it myself, then I did the distressing using Marmalade and Peeled paint. Love how the embossing soaks up the colours and really emphasizes it. Then I put music paper I printed off the internet for FREE and glued that on, a Sing ckear sticker and some felt flowers with a sparkly flourish my good friend Becky in Maine sent me.
This is not a true shaker as I didn't add anything to this one just the transparency done the same way as above.


This one is rather silly, a girl naked riding a broom handle, I suppose it is more Halloween' ie but I liked the image and called this one Night Flight. LOL Inside the shaker I added gold and purple beads. The paper on the slide mount is done the same way as Marmalade above. The background paper is Glorious Brayered paper I learned to do then I embossed the edges with gold sparkle Embossing Powder and took the prongs off the star brads and attached using Glossy Accents from Ranger.

And Oh to be Young,( has been TRADED)  GBP background with distress Rub Ons ,just love those must find some more, music paper again inked on the edges, again the dragonfly brad attached and the shaker with beads of purple and gold.
I have one more shaker but it is not attached to anything yet but when I do it will be available for trade.


This is NOT a shaker but I used half a slide mount covered it in Brayered paper and rubbed on Distress Rub ons again and added some tiny glass beads here and there. The face is paper casting, I used a Polymer Clay face mould and pushed wet cheap toilet paper( no it wasn't used before hand, I can see you thinking that) and I pressed several layers together making sure all layers are wet through. Then I dried it with my heat gun for my lack of patience and then popped it into this frame to see if it would fit and it did. this is called ART EXHIBIT and has been TRADED too.
Thanks for looking.
L

Friday, March 12, 2010

Bleach that colour out....new tut and spring is here

First of all before I begin the tutorial I want to say we had our first sighting of a robin and we heard red winged blackbirds today. Spring is definitely here. Yippeee skippee, the driveway is a mucky mess the snow is melting and the birds are back, that makes Lesley a very happy camper.

Ok lets talk about a tutorial that involves bleach. This will show you how to do 2 ways of using bleach to bleach out colour in your carstock and get WOW backgrounds.
Let's talk safety first as I always do, bleach has an odor so make sure you use good ventilation, make sure you have your craft table or area covered well, if you are sloppy that is like I can be. Clean up directly when you are done to remove bleach from any work surface, do not get it on your hands, wash immediately if you do and if you have any respiratory ailments like asthma then I wouldn't recommend you do this.
Again this is NOT my original idea and is a visual tutorial only.
Now that we have all this covered lets begin....

You will need, some stamps, clear embossing powder, VersaMark watermark ink, either a waterbrush or a plain paint brush will do, a plastic lid that is large enough for you to place your stamps flat, a folded up paper towel with straight bleach poured on, this is your stamp pad, some coloured cardstock, heat gun, (not shown) and a protective covering to work on. You can't really see it here but I have a clear plastic place mat.

I have chosen a pebbly sort of clear stamp to use on my background on this golden coloured c/s, stamp into Versamark then stamp on your c/s, I did one side then stamped the other side.
Next I covered the whole stamped area with clear embossing powder (EP), then tap the excess off and return it to the container and put the lid on, unless you are doing more cards with this technique while the bleach and everything is out.
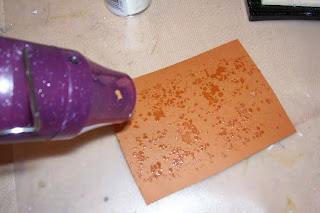
As you do with any embossing, hit it with the heat gun untill the powder turns shiny and melted. Do not overheat.


Now you can do one of two things here, since you have the paper towel with bleach on it and it is good and damp, if you do not have a waterbrush you can just use a regular paint brush and just damped your brush on the stamp pad you made and brush the bleach on, or as you can see here, I have a waterbrush filled with straight bleach and I stroked it done the whole page  here and there. Right under where the brush is positioned I squeezed the brush a bit too much and so I have lots of bleach pooled here, so I just move it around. You can also avoid some areas here and there or away from the edges, and as you can see where you embossed that area RESISTS the bleach leaving the original colour of the c/s.
But wait there's more.....

And here you can see it beginning to really bleach out. I did a bit too  much squeezing and perhaps should have done that over the paper towel but oh well, happy accidents don't bother me, they just add to the art.
Now you can leave this to dry on it's own or you can dry it with the heat gun and watch how fast it all bleaches out.
Next I will show you how to stamp with just bleach and see how it looks.


So here I have a background stamp I like using, got this baby at the dollar store of all places. I placed it on my bleach stamp pad, lift then place it directly on the paper, I started at the top.....


and press it onto the c/s and just leave it there for a couple few seconds.
If you see at the top the colour is starting to bleach out of the green already, continue stamping. I did the bottom and the bit of the sides to the right to cover the whole piece of c/s.
Now again, you can either let this dry on it's own or if you are impatient as I tend to be, I hit it with the heat gun again and you are ready to use your paper for art.

And here are 2 ATC's (for trade) that were completed using this method, the left with the EP and the right using the stamp. One other thing you can do and I didn't show you but I have done it, after your bleached design dries if you used stamps,  you can take either decorative chalks or pencil crayons and colour in the bleached areas. I have seen this done on black paper bleached out and it looks stunning.
So try some bleach.
Remember to make sure you wash your stamps well, dispose of that bleach too so little hands don't get into it.
Always practise safety, even in art.
Thanks for stopping by.

Sunday, March 7, 2010

Malware free, you can come back now....PLEASE

Well I did some investigating on the Blogger help files and I believe I have figured out what the problem was, at least I think. On Thurs of this past week I added a widget to the bottom of my page, it was a visitor counter or hit counter. Well Mum detected the Malware on Friday night then she visited the blog again on Saturday morning and got a malware detection again so she called to inform me. I then went to the help files and typed in malware and viruses and widgets are a know thing that malware can be attached to. So I believe the counter that I downloaded from Blogger's list of widgets is where I got it from. I since have removed it and Mum has tested the site for me and NO MORE MALWARE.
I have not heard from Blogger as of yet and maybe I won't but if you do have malware or decided to pick a widget for your blog be warned. I also learned that most virus programs, I use McAfee, do not detect Malware so I had no idea. Blogger has a couple sites that you can download free programs so if you need it it can be located in their help section.
I appologize if I scared anyone but I thank Mum for letting me know so I could get right on the issue.
Please come back and visit, I would hate to think I scared everyone of my followers and visitors away, I would be very sad.
Til next time, L

Please be aware

Hello friends
I just wanted to warn you that I was informed by my Mum that when she came onto my site she got a malware detection from her computer. I have informed blogger and just wanted to let you all know that something has probably attached itself to my site.
I have not heard from blogger as of yet but they have been informed so either stay off til further notice or if you have experienced any similar notices could you please email me.
Thanks and I hope I did not infect anyone, I didn't even get a notice or anything so I am grateful to Mum for letting me know and hopefully Blogger can do something. If and when I find anything in the meantime I will certainly let you know.
Thanks bunches.
L

Wednesday, March 3, 2010

Bees wax tutorial for collaging your ATC's and art

Hello Peeps, this evening I am going to show you how to do a collage on your ATC, you will not be needing any glues except if you are using a cardboard backing for support then glue your first layer of paper onto that. Then put the glue away and I will show you how quick and easy it is to use bees wax.
I must first tell you be careful  like any wax if it gets too hot can catch on fire. If you are using your stove to melt the wax then use a double boiler type of system. Here I am using an old pot pourri burner, remember when we used to put pot pourri in water then plugged this little crock in and your room filled with the scents, then a mucky mess afterwards to clean up if it didn't get forgotten and got all mouldy. Well I have had one of these for ages and I use it to melt wax in, having a cat I would hate to see her tail get caught in a flame and all of a sudden you are chasing a cat on fire. Not a good idea. Just remember do NOT leave wax unattended at any time and remember safety first.
This is not my original idea and again I am just giving you a visual tutorial so this may help you to try something new to your altered art or ATC's.
Here are your supplies: iron dedicated for crafts, got this for 2.00, old paint brush doesn't matter what size, I had this one just for wax, small crock or something to melt your bees wax in, bees wax either a candle or sheets of natural not coloured, papers to make your collage for your ATC or altered book or artwork, a piece of wax paper large enough to fold in half and place your card into and a sheet of either newsprint type of paper with no print or ink  or a piece of computer paper, again large enough to fold in half and cover the wax paper and ATC.

1. Melt your wax in the crock or whatever you use, this may take a bit of time.
2. Decide ahead of time what you want your ATC to look like and get your papers cut out or torn etc.
3.Dip your brush into you melted wax and work quickly,  I had to use 2 hands  one hold items and  other take pics, I like to hold my ATC in one hand near the crock and dip and stroke on the beeswax close to the crock. The bees wax starts to harden quickly so you need to work quickly and do one layer of paper at a time.
4. Stroke the beeswax onto your first layer, here I attached my backing layer as mentioned at the very beginning with glue but now I am attaching my one image on the backing paper. Make sure that you  go around any edges of your papers and stroke over top of your image. It is going to get milky looking and bumpy but wait to see what happens as we go along.
5. I am now adding another layer of torn paper on the edge, it has gold Chinese characters on it and again make sure you stroke the wax along all edges. I even sealed the outside edges of the ATC, you can remove the chunks at the end.
6. I have now added my last image and if you click on this pic for a better and larger view it looks very bumpy and milky. We will take care of that in the next few steps.

7. Now take your wax paper and fold it in half if you haven't done so already and place the ATC in between that layer. Fold your computer or newsprint (no printing on it) and place your ATC and wax paper inside the  computer paper. You know have a sandwhich.

8. Now take you iron, doesn't have to be set on high and NO steam, iron your sandwhich. You will start to see the wax moving around and  will come off onto the computer paper, keep ironing it around, move the iron, do not let it sit in one spot too long, You don't have to do this for very long.
Now wait a minutue or two, allow the papers to cool down. Removing the wax paper from the ATC too soon may actually lift the bees wax off so just be patient.

9. Here is what it looks like when the ironing is done and you can see what I mean by the wax on the paper.
And here after removing the paper and wax paper from your ATC again after you let it cool..........

This photo does not really do this any justice but believe me it looks exactly the way I picuted it. As mentioned above if you still have a few chunks on the edges of your card then just break it off or smooth is off gently with your fingers. The wax is still soft and pliable.
Another thing you can do is buff your ATC with a tissue or soft cloth and it will be as smooth as a baby's bottom.
Your ATC also smells like honey.
Just for your information do not try to use plain wax for making candles to seal your work, this wax will only crack and eventually crumble and ruin your artwork. You can get sheets of bees wax I believe at Michaels, or most candle shops should carry candles made of  beeswax, even some places that sell honey. I am sure there are lots of online sources as well.  
Hope you enjoyed this tutorial and if you have any questions or concerns or just want to comment I would be happy to hear from you.
I would love to see some of your ATC's collaged with bees wax
Enjoy.                                                 

Monday, March 1, 2010

WINNERS of the Giveaway

Yes you read that right, Winners, plural. Lesley was feeling very generous over the weekend and I worked all weekend to make another paperbag album. So without further adieu, picked by Random.Org, drumroll please.....
The winners are post #1 Barb in the Netherlands, woohoooo and the 6th poster was Sue in the UK better known as suzieboozie. Congratualtions ladies and your goodies will be in the mail this week. I have been to town today and was feeling a bit off but I will get your items packed up and ready for my next trip.
Thank you everyone for visiting me and giving me encouragement to continue blogging and creating.
I am feeling a tut (not the gassy type) coming on so stay tuned for some beeswax ATC fun.
Related Posts Plugin for WordPress, Blogger...