Ok lets talk about a tutorial that involves bleach. This will show you how to do 2 ways of using bleach to bleach out colour in your carstock and get WOW backgrounds.
Let's talk safety first as I always do, bleach has an odor so make sure you use good ventilation, make sure you have your craft table or area covered well, if you are sloppy that is like I can be. Clean up directly when you are done to remove bleach from any work surface, do not get it on your hands, wash immediately if you do and if you have any respiratory ailments like asthma then I wouldn't recommend you do this.
Again this is NOT my original idea and is a visual tutorial only.
Now that we have all this covered lets begin....
You will need, some stamps, clear embossing powder, VersaMark watermark ink, either a waterbrush or a plain paint brush will do, a plastic lid that is large enough for you to place your stamps flat, a folded up paper towel with straight bleach poured on, this is your stamp pad, some coloured cardstock, heat gun, (not shown) and a protective covering to work on. You can't really see it here but I have a clear plastic place mat.
I have chosen a pebbly sort of clear stamp to use on my background on this golden coloured c/s, stamp into Versamark then stamp on your c/s, I did one side then stamped the other side.
Next I covered the whole stamped area with clear embossing powder (EP), then tap the excess off and return it to the container and put the lid on, unless you are doing more cards with this technique while the bleach and everything is out.
As you do with any embossing, hit it with the heat gun untill the powder turns shiny and melted. Do not overheat.
Now you can do one of two things here, since you have the paper towel with bleach on it and it is good and damp, if you do not have a waterbrush you can just use a regular paint brush and just damped your brush on the stamp pad you made and brush the bleach on, or as you can see here, I have a waterbrush filled with straight bleach and I stroked it done the whole page here and there. Right under where the brush is positioned I squeezed the brush a bit too much and so I have lots of bleach pooled here, so I just move it around. You can also avoid some areas here and there or away from the edges, and as you can see where you embossed that area RESISTS the bleach leaving the original colour of the c/s.
But wait there's more.....
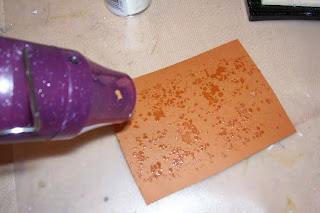
Now you can leave this to dry on it's own or you can dry it with the heat gun and watch how fast it all bleaches out.
Next I will show you how to stamp with just bleach and see how it looks.
So here I have a background stamp I like using, got this baby at the dollar store of all places. I placed it on my bleach stamp pad, lift then place it directly on the paper, I started at the top.....
and press it onto the c/s and just leave it there for a couple few seconds.
If you see at the top the colour is starting to bleach out of the green already, continue stamping. I did the bottom and the bit of the sides to the right to cover the whole piece of c/s.
Now again, you can either let this dry on it's own or if you are impatient as I tend to be, I hit it with the heat gun again and you are ready to use your paper for art.
And here are 2 ATC's (for trade) that were completed using this method, the left with the EP and the right using the stamp. One other thing you can do and I didn't show you but I have done it, after your bleached design dries if you used stamps, you can take either decorative chalks or pencil crayons and colour in the bleached areas. I have seen this done on black paper bleached out and it looks stunning.
So try some bleach.
Remember to make sure you wash your stamps well, dispose of that bleach too so little hands don't get into it.
Always practise safety, even in art.
Thanks for stopping by.


.jpg)


Thanks Les, great tute, can't wait to give it a go....your cards look fabulous!!
ReplyDeleteHave tried this before and it's a great tut. Nice visual.
ReplyDeleteWow Les that's a Great Tut! I love the stamping with bleach to give that patterned background! Comes out fab! Sue xx
ReplyDeleteThank you for your tutorial Lesley you really go to a lot of trouble for us. I will be sure to give this technique a go. I am giving ATC's a try and this technique will give a lovely background. Thanks again.
ReplyDeletewoot woot to spring Les, can see youre excited by the new blog look!!
ReplyDeletethanks for the tute , its great , i have done one but will have a go with plain cardstock and the coloring in sounds wonderful.... jenxo
wow.. this is great.. that top one is amazing.. but this will mean actually using my heat gun...lol
ReplyDeletethank you for a great tut.. you always do such a great job on them..
xoxo
This is a very interesting tut. Thanks for sharing it.
ReplyDeleteNicole/Beadwright
Fantastic tutorial! I have always wanted to try bleach stamping.
ReplyDeleteThanks for sharing.