Seems to be of late with nice weather my posts are few and far between and when I do have something to say or show you it is long winded.
I wanted to show you this quick tutorial on " Did you Know" you can make your own alcohol ink for a fraction of the cost of retail ink? Well I am going to show you how easy and affordable it is.
I bought a package of markers in the kids section of the dollar store, they do not have to be expensive Sharpie brand, you can use ones that are starting to dry up but not totally, I bought a package of 24 for 2.00. The package contained 2 different values of each of the colours, so in this tutorial I will use 2 markers in yellow but different shades of yellow but it will still be bright enough for your projects.
What you need.....markers, scissors. alcohol, I used 50 percent because that is what I had in the bathroom but I would suggest a higher volume like 70 or even 99% if you can find it. 50 is OK but takes a bit longer to dry. The higher the percentage the faster it will dry but a heat gun comes in real handy, OK, small plastic containers for your alcohol ink, I got a package of 6 at the dollar store, and if you have forceps or tweezers then you are good to go.
Take your tweezers or forceps and grab the plug at the end of the marker and pull it out. It may take a bit of a twist but gently remove this, then toss in the garbage.
You may want to use gloves for this part, I didn't but maybe should have, now you have this felt piece covered in plastic that contains the ink part of the marker.
You are going to cut this up in pieces that will fit nicely into your container. You can see the different colours of yellow but ultimately it will be yellow and fairly bright...yeah.....
Next, pour your alcohol over the cut up pieces .....
I covered the pieces so that it is over top of the contents and then start to swirl the alcohol and nibs around and you can see the colour start to come out. Leave these nibs in, place the cap on the container and I leave it for a few days. you can leave them in or completely remove them but use your tweezers and squeeze the alcohol out of them, then discard in garbage.
I haven't had time to make proper labels yet so I used tape for now, make sure you put the lids on securely. These are not in a dropper container like the store bought inks but I use a q- tip for now to apply the inks to my projects with a little alcohol just like you would with the store bought brands. I need to find an eye dropper , it would make this so much easier to apply to my projects but I will have to keep my eye out for one....no pun intended. LOL
And here, this was done quite quickly so I just wanted to show you how they look. Next time I will only stick to one colour, I used Turquoise and pink and got a little carried away with the blending, it looks a little muddy but you can use alcohol to move it around.
I hope you liked this tutorial and hope that if you are like me, frugal is not a bad thing, I hate having to save and save or wait til the budget permits to buy 3 alcohol inks in a package for only maybe 2 I really like, and, this way you can have a lot more colour variety if you are not totally into the grunge factor.
If you make any of these, I hope you will share what you made or what colours you used. I would love to hear your feedback.
And.....I made another domino book for a challenge over at the Yahoo group by Gecko Galz Papercrafting group. Leanne provided domino sized images for us to use so I decided to make a book with them. Since I am a little fond of books I wanted to make one and perhaps this will be a prize for an upcoming celebration. You will have to wait and see.
I did an accordion fold, I used black card stock then I applied gold ink to the edges of the paper, then I cut the images, edged them with gold gel pen then applied to the black paper. I used a nice organza ribbon with gold edges on it to tie the book closed on both sides.
I love challenges, I never know what will transpire and that is what makes creating for me so much fun.
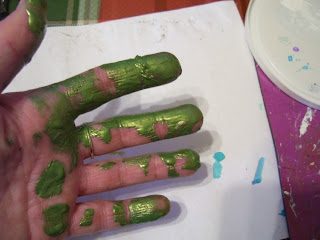
And....have you ever had a fight with paint???.....looks like I lost the battle here...
How did this happen you ask??? Well another frugal endeavour making my own glimmer mist with Folkart Metallic Peridot paint....I unscrewed the cap to find there was a sort of dried up glob at the top of the bottle, I pulled it with my finger and before I know it the paint is all over my hand....never had a fight with paint before.....did I get my glimmer mist made...you bet I did and it is wonderful. Love it but hate the price so me being frugal and don't mind making my own things I have to say I am quite impressed.
Til next time my friends....stay crafty and beware of your paint......


.jpg)


Hope you didn't waste all the paint on your hands and wiped it onto some paper, or made hand prints on another bit of paper:):)
ReplyDeleteLove that little domino book, really lovely
Well, but your fingers are a lovely shade of green! Great idea with the alcohol inks, must try that. They are sooooooooo expensive here. Love the domino book, too. Enjoy your good weather, it's nice here today, too, but we have rain promised for the weekend again! Hugs, Valerie
ReplyDeleteYou are so clever Les, making your own alcohol ink. Thanks for sharing. Love your domino book!
ReplyDeleteFrugal is good Les! TFS your tutorials, so clever. Love your green fingers - lol - and the domino book is lovely too x
ReplyDelete