Thursday, March 29, 2012

Do you see what I see????

Well the other morning my hubs was looking out our back kitchen door and said come quick hon, I was beginning to roll my eyes because he has pulled fast ones on me before, (I rarely see deer out here and one time he made me go to every window in the house , saying come quick come quick only to start laughing and telling me there was no deer) so this time I really had to think whether I was going to get sucked in. He stayed at the door and said move slow and come quick, hurry hurry. So I get to the back door and look out and coming down the lane way (which leads back to farmer's fields and becomes our driveway) I couldn't believe my eyes, a  bunch of wild turkeys, and I mean a bunch. They were huge, the Toms were quite large and as we got to counting there were about 20 in total. They came down the driveway and stopped at the end of the driveway then proceeded to go on the road then back around to the other side of our house and towards the creek. It was quite a site, I am sorry you can't see them very well in this picture, but, if you click you make get a better view. We had to stay quite still and quiet because even when we went to our other kitchen door they stopped and were very cautious.

Other than that, not much has been happening. I have been working on making a few gifty items, working on some small 3x3 cards, turning out really cute. I will show them another post.
Hope everyone is enjoying spring like weather. We have noticed a change in temperature again and calling for snow tomorrow. Yikes, so, I think tomorrow is going to be an inside day.
Til next time, be creative and content.
Gobble Gobble

Thursday, March 22, 2012

A few sketches, blog candy winnings and a card

Well today was another lovely day and I was able to do some cleaning up of a few things that needed to be done outside.
We just had a very short sprinkle of rain and I say that loosely.

This afternoon I worked on a card I am making for my dear aunt in England. I used a metal stencil in the shape of a stained glass window. The stencil can be put through the Cuttlebug but it does not cut the paper. So after I ran it through the CB I then cut out all the little windows because I wanted a stained glass effect. I used some acetate with some of my own alcohol inks and a few of rangers to get the strong colours I was looking for. This isn't the usual nice church window with images done of course but more of an arty window and this is what I came up with. I really enjoyed making this and even tho the cutting was a bit tedious I had a good sharp craft knife and cutting mat and before I new it, it was done. The window is cut from black card stock then I inked it with some gold ink that is almost dried up but I wasn't going for really bold gold, I wanted an aged look and I think it turned out pretty good. I added some gold border to the card stock then placed the whole thing on a base card I had a supply of in my stash. I added a flower sticker and the top of the window has a corner filigree sticker. Most of the supplies came from a store just down the road from me called Ecstasy crafts, Dennis and the gang are exclusive distributors of card making items from the Netherlands and the prices are very good and the quality outstanding not to mention the customer service. I hope my Auntie likes this card, I know I do. LOL
Next up, I just received my blog candy from Helga over at her blog My Artistic Life, Helga also owns and operates Artchix Studio one of my favourite online art shops. Helga posted what inspires us to make art and I said I loved Victoria British Columbia, also where Helga resides, because of it's beauty and flowers etc. Bruno her cat picked my number and I won this little matchbox Helga altered with all these cute stickers. The little birds are so cute, they are very small and would look great on inchie art. I also received some washi papers as well and the envy was all decorated in Helga's Artchix sticker style. I  love winning stuff but rarely do, it's luck of the draw for me. Thanks Helga and Bruno for picking me.

 And 2 sketches, I had a few more to show you but they were very dark, I took the pics when it just finished raining and the light was on but was still a little dim so please excuse my lack of photography skills, I just aim and hope for the best. LOL.
This is a ballerina I did a few weeks back, I think so far she is my fav. I did another one with ballerina shoes beside her but I do like this one. Her features are so gentle and soft.
 And remember I told you I had some books out from the library and saw this exercise, running shoes??? well here they are. They were tricky but I always love a challenge. I found doing the laces really tricky, overlapping them and getting all the shading and details in. I actually like the bottom part of the one sneaker the best. Not sure why,  I got those little dimples in and they look you could touch them.
Just remember for better details, click on the pic and it will enlarge in a separate window.
Since starting to sketch late January I already see vast improvements but I still have a long way to go. I think I would like to start to do birds next. I love birds and living in the country we see all kinds and many varieties.
Well that is it for today, thanks for dropping by and I always love to read your comments. Don't be afraid to critique my work, I think we need to hear the pos and neg on things in order to improve.
Stay creative my friends,

Wednesday, March 21, 2012

Did you Know?? alcohol ink tutorial, a fight with paint and......

Seems to be of late with nice weather my posts are few and far between and when I do have something to say or show you it is long winded.
I wanted to show you this quick tutorial on " Did you Know" you can make your own alcohol ink for a fraction of the cost of retail ink? Well I am going to show you how easy and affordable it is.
I bought a package of markers in the kids section of the dollar store, they do not have to be expensive Sharpie brand, you can use ones that are starting to dry up but not totally,  I bought a package of 24 for 2.00. The package contained 2 different values of each of the colours, so in this tutorial I will use 2 markers in yellow but different shades of yellow but it will still be bright enough for your projects.

What you need.....markers, scissors. alcohol, I used 50 percent because that is what I had in the bathroom but I would suggest a higher volume like 70 or even 99% if you can find it. 50 is OK but takes a bit longer to dry. The higher the percentage the faster it will dry but a heat gun comes in real handy, OK, small plastic containers for your alcohol ink, I got a package of 6 at the dollar store, and if you have forceps or tweezers then you are good to go.

 Take your tweezers or forceps and grab the plug at the end of the marker and pull it out. It may take a bit of a twist but gently remove this, then toss in the garbage.
 You may want to use gloves for this part, I didn't but maybe should have, now you have this felt piece covered in plastic that contains the ink part of the marker.
 You are going to cut this up in pieces that will fit nicely into your container. You can see the different colours of yellow but ultimately it will be yellow and fairly bright...yeah.....
 Next, pour your alcohol over the cut up pieces .....
 I covered the pieces so that it is over top of the contents and then start to swirl the alcohol and nibs around and you can see the colour start to come out. Leave these nibs in, place the cap on the container and I leave it for a few days. you can leave them in or completely remove them but use your tweezers and squeeze the alcohol out of them, then discard in garbage.
 I haven't had time to make proper labels yet so I used tape for now, make sure you put the lids on securely. These are not in a dropper container like the store bought inks but I use a q- tip for now to apply the inks to my projects with a little alcohol just like you would with the store bought brands. I need to find an eye dropper , it would make this so much easier to apply to my projects but I will have to keep my eye out for one....no pun intended. LOL 
 And here, this was done quite quickly so I just wanted to show you how they look. Next time I will only stick to one colour, I used Turquoise and pink and got a little carried away with the blending, it looks a little muddy but you can use alcohol to move it around.
I hope you liked this tutorial and hope that if you are like me, frugal is not a bad thing, I hate having to save and save or wait til the budget permits to buy 3 alcohol inks in a package for only maybe 2 I really like, and, this way you can have a lot more colour variety if you are not totally into the grunge factor.
If you make any of these, I hope you will share what you made or what colours you used. I would love to hear your feedback.

And.....I made another domino book for  a challenge over at the Yahoo group by Gecko Galz Papercrafting group. Leanne provided domino sized images for us to use so I decided to make a book with them. Since I am a little fond of books I wanted to make one and perhaps this will be a prize for an upcoming celebration. You will have to wait and see.

 I did an accordion fold, I used black card stock then I applied gold ink to the edges of the paper, then I cut the images, edged them with gold gel pen then applied to the black paper. I used a nice organza ribbon with gold edges on it to tie the book closed on both sides.

I love challenges, I never know what will transpire and that is what makes creating for me so much fun.

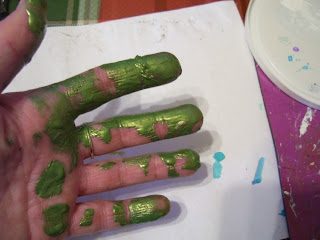
And....have you ever had a fight with paint???.....looks like I lost the battle here...
How did this happen you ask??? Well another frugal endeavour making my own glimmer mist with Folkart Metallic Peridot paint....I unscrewed the cap to find there was a sort of dried up glob at the top of the bottle, I pulled it with my finger and before I know it the paint is all over my hand....never had a fight with paint before.....did I get my glimmer mist made...you bet I did and it is wonderful. Love it but hate the price so me being frugal and don't mind making my own things I have to say I am quite impressed.
Til next time my friends....stay crafty and beware of your paint......

Sunday, March 11, 2012

Did you know?-Tissue Tape tutorial and happy mail

I know I started a "Did you know" idea back in the fall then I sort of dropped it while I was scrambling to do my craft shows but I got thinking the other day, I am going to try to do a tutorial or lead you to info that you may not already have or to refresh your creative mind, we can always use a little help now and again.

Today I want to say....Did you know?... you can make your own tissue tape??? well you may have  or maybe just never bothered, but, once I show you how easy it is and how little materials you need you will be happy I showed you this.
Here in Canada Tim Holt's tissue tape is very pricey and I do like Ranger products, don't get me wrong, but, I find sometimes you are limited when you buy some of these things and can only use things on grunge projects or not so feminine looking things. Well, I have some great news, you can make your own tissue tape, just enough for a special project, or, you can make some to have on stash or just make some blank ahead of time when you need to  make that card in a hurry and you need a little pizazz.
OK enough gab about it...here we go....
All you need is double sided tape, I buy mine at the dollar store and you can get different widths, this size is about half inch and I got 3 rolls for under 2.00, tissue, you can use dressmakers tissue, gift tissue or even a nice napkin with a pattern on it, tissue comes in a variety of colours or just use white and you can see how quickly you can transform it. You may need ink, stamps, scissors and that is it.

Not sure why but my picture loaded sideways, but you get the idea, the green card stock is just for a contrast in colour so you can see the tissue.


 Roll your tape onto the tissue, try to keep it straight and the paper smooth, if you do get a few wrinkles, it just adds a bit of texture to the final result. Make as many strips as you like so you have some on hand in a hurry. If you look a the bottom of this picture you will see I left a little tissue overhanging, that is so it makes it easy to peel back the backing of the tissue tape, you can trim that bit off after you adhere to your card or project and tidy it up.


 Now trim the sides of the excess tissue.
Next I had made my own shamrock stamp for another project and I am in another swap for March so I made my partner some tissue tape for our Shamrock theme. Before I stamped the tissue, I just lightly inked the tape, don't worry if you don't get the inking perfect, it adds interest. Next stamp your stamp. I have made some tissue tape in a collage style using numbers, small clocks etc. Try anything, it really is fun and quick.

 And below is the tissue tape that I stamped on the left and the middle and right side are napkins. Remove both layers of that white fine paper from you napkin and you may want to press the napkin with an iron or just lay it out and place your tape on the opposite side of the design. Trim and you are good to go. Remove the backing and place carefully onto a card or altered project.
I hope you enjoyed this little tutorial....Did you know?.....you can make your own tissue tape for a fraction of the store cost and you can make it more suitable to your theme.
After I made the Shamrock tape, I took a gel pen and just outlined the shamrocks, made them pop a bit.

  And below I want to share a beautiful Spring theme ATC I received from a long time follower of my blog,   Amy Jo from Art from the Heart. Around Christmas time we decided we wanted to swap art and well the holidays are always a busy time of year and lately we have both been saying how we are anxiously waiting for spring. So we decided to do an ATC in the theme of spring. I received this lovely ATC and below the pic is the backside just as beautiful as the front. I wonder how she knew I love sunflowers, they are my favourite. I also had a pic of the goodies Amy sent along but the pic was sideways and I wasn't going to leave posting.
Thank you Amy and I hope you get my little package soon. I hope you like it.


Til next time friends. I am working on a little whimsy faces booklet for my dear Aunt in England. I just need to work on the pages and it will be done soon.
If anyone has any great quote sites that makes one smile or makes one feel good on a not so good day, could you please let me know. I would like to add some sayings or quotes to my little book.
Thanks all for dropping by.

Friday, March 9, 2012

Mini domino books and 1x3 trade cards

Hi all, well I have done a little tidying up from things piling up on my table. I was involved in a private trade and finally got everything done and sent off today. I joined a new swap blog and I will give you links to all the blogs involved in my post as I go along.
This is a little long winded so be warned.

First up I wanted to share this darn cute birdie mini domino book I made. My friend Becky had sent me some mini dominoes late last year and I made some necklaces with them but after doing a few large domino books and I really enjoyed them, I thought, why not do a few minis and then I can send them to swap partners now and again with my trades.
Since signs of spring have been on and off the last week or so with some warmer temps, birds starting to return and the days are lasting a little longer I was inspired to make this mini bird book.
So here is what it looks like, click on the pics for a larger view if you have trouble seeing some of my details. These were fun and so very addicting.
 Below is a regular size domino and the little one is the size I just finished making, cute huh? I alcohol inked them in my fav colour and it reminds me of spring and all it's new growth.

I used scraps of paper, I found a bird charm, how lucky was I, thanks to a past swap partner I think was Smifferoo aka Jan.
I punched out some black paper for the holes and then put a white gel pen to make it a shadow and then used pencil crayon on the outside around the one side to make them pop so the birdies can see their way in.
 A bird eco shape and egg print from Artchix Studio with some burlap
 A sticker word, music paper from a hymnal, a tissue paper bird fussy cut and a chickadee stamp
 Rub ons, Artchix German scrap, love that stuff
 another rub on, an inchie bird stamp cut out and a definition of bird from a dictionary used just for art.
And tied together with some nice gold cord

Next up is another domino book that I made for St. Patrick's day using some free images from Leanne Seeds blog, Fripperies and Butterflies, and as I told you in a previous post, I will be a guest artist come this August for her Gecko Galz digital scrapbooking store.
If you go to the Fripperies and Butterflies blog you can snag up Leanne's free images.
When I saw these I knew immediately I wanted to make a cute mini domino book.

I didn't have any shamrock paper so I made myself a shamrock stamp out of fun foam and stamped my scrap paper with Peeled paint and stamped shamrocks on it. I made shamrock shrinky dinks. I messed them up a bit with my gold paint pen but hey, being that small it's hard to get precise.
I used some known sayings for St. Patrick's day, nothing to long so they would fit on the tiny pages.

This is the front. I had to crop and fussy cut the images so they may look a little different than Leanne's original images on Fripperies and Butterflies.

 And this is the accordion fold out. I even put a little Stickles on the brim of the hats, you can't see it but I just had to make it sparkle. I also added a nice gold sticker border around the outside, it almost looks like it was soldered. I think green and gold just naturally go together. 
Thanks Leanne for making this such a fun project for me. Can't wait to do more.

And last but not least, I found a new swap blog called Tabby"sSwaps, hosted by lovely Kim.
This month they are doing 1x3 cards in the theme of Vintage Children.
These were fun, and quite quick. There isn't a lot of room to play with.
I did do one digital image with Gimp brushes and a cute girl from FlickR.
I added a neat puzzle sticker over one of my cards, you may have to click to see it up close but it is very interesting. Might have to use them a bit more often.

Well thanks for sticking it out and I hope you have a lovely weekend. It snowed today but it won't last long now. We can only hope for warmer days ahead.
TTFN

Monday, March 5, 2012

A couple ATC's

Hello friends,
No I haven't disappeared off the face of the earth, just been doing a bit of catch up and sort of laxing on the creativity. You know when you sit down and you do something and later it doesn't seem like you accomplished much??? I have been kind of like that, although I did get all my ATC backgrounds done and sent off to Jenxo in Australia for the background technique swap. I can't wait to see what comes out of that trade. I did 4 backgrounds to add to our books. Wooohooo

And I had to redo my February matchbox for Jan in the UK. Apparently when I went to the PO last week the girl filling in put the code UK in the computer and said oh this is going to the Ukraine? I said no, it is going to United Kingdom, England. Apparently our great Postal system says the UK is Ukraine and GB is Great Britain but all this time when I have sent things out it went to England, but, Jan did not receive my first matchbox and it has been long overdue, usually things get to the Great Britain (UK) in about a week or just under, faster than our friends below us in the US (United States). LOL
I seem to have to clarify where things are going in case someone from our Postal system reads this, and of course I did not save my receipt after one week because I have never had a problem before til now. So Lesley is out postage.
Oh well, on to other things.
And, I have been sketching, no I don't have any more to show you today but yesterday I took a book from the library that I have here at home and saw these sneakers so I had to tackle it. It was very detailed and I think, if you know me, that is what attracted me to it was all the detail. I am a detail person and well I was quite pleased with the end result, another day for sketches, I didn't want to bore you all with them.

And...I am doing an ATC swap with another blogger who has been following me for quite some time, and I am not sure if she will be looking so I won't mention any names yet. I am doing a matchbox swap as well for March and so who knows where these or which one is going where.
I love the fairy ATC, I added some wired music wings to her and crackle painted the gate behind her. Added some flowers with Stickles,I really like how this turned out. The fairy is raised up off the card with some foam tape. She turned out better than I expected....I wonder where she is flying off to next???
This one is titled " In my Garden"
 And this card is called Migration. I used K and Company scrap paper, the background is a faded map of North America, the bird is from the Graphics Fairy, thanks Karen, the word "migrate" is from a dictionary I use when I want definitions in my art, some burlap and I had a shrink plastic wing charm that I wired through the burlap. Birdie is migrating to somewhere, I wonder where.
I haven't made too many ATC's of late and I really enjoyed it. I really think mine out, they don't just happen over night...it is a rather long process with me, sometimes too long.
Well I have several projects in the works, one is going to take quite a while as I am designing it for the Gecko Galz Guest Artist spot in August.
Another project I am working on is an altered tin with an accordion book inside, I  get a newsletter from Paper Whimsy and Nancy Maxwell James has done it again. My book is going to be a bit different but that is what I like about art, you make it how you like with the help of inspiration by others willing to share their ideas.
Well that is it of now my dearies.
TTFN
Related Posts Plugin for WordPress, Blogger...