I joined a new group on Ning after the New Year called Bella Creations and they have several smaller groups that branch off from the main group. The one group I really like is called Beaux Embellissements. This group shares all kinds of embellishments for paper crafting and to my surprise I have learned different ways to make flowers and butterflies. I really like the brainstorming on everyone's methods, we all share what we did, what worked what didn't or what we added to make it our own take on it.
So after discussing a few other embellishment ideas with Lacee I am setting up this tutorial for you and the group to tell you how to make some easy and really neat faux metal embellishments using just a few supplies I know you already have.
So enough chatter lets get busy.....
Supplies: hot glue gun and a couple sticks, regular household tin foil, alcohol inks(whatever colours you chose) and or sharpie markers the thicker type are best, something to catch glue drips, I used a metal lid, found objects, can be stamps, old keys, other embellishments that have good detail but not too fine, q-tip for burnishing and a tissue or two. Good work surface, I have a rather tatty cutting mat and a clear non stick mat, just in case you drip inks or melted glue stick.
WARNING: glue is hot so be careful. Safety FIRST

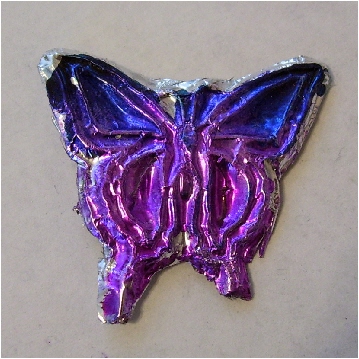
Cut your foil to a bit larger than the size of your stamps or found objects. You can also use acrylic stamps but I grabbed this butterfly to see what I would come up with.

Take your q-tip and start at the outer edge of your object, you are making a mold so to speak and be careful going around the edges so you don't tear the tin foil. I started using a q-tip as I have a lot of luck.
By starting around the edge you also get the foil snuggly fit and less stretching than if you started say in the middle. Next you run the tip over the surface getting into the nooks and crannies. Again be gentle but work evenly around and on top of the object or stamp.

Once you have done all your items, carefully lift the tin foil and see if you are happy with your results. If not either flatten the tin foil out and start again or just rip another piece. If you work the tin foil too much you weaken it and has a tendency to tear...ask me how I know this........been there done that.

Now flip your foil molds over and fill them with hot glue, start in an area and move and push the glue around, and fill the area. Remember the glue is HOT so be careful. Safety first.

Do all your embellies then let them cool and set up. They won't take long and don't touch,

Next you can do one of two things. I tried both together and I will say I was not happy with it so try them individually.
Take a black or any colour Sharpie marker and colour the surface of the object. Here is one of my keys.
Don't be worried about neatness, the grungier the better.
If you wish and don't want to use a marker then drop alcohol inks on and have fun.
I tried both together, the Sharpie is not a true black on the tin foil, it almost looks a bit blue. I wanted a rusty look with the combo of Alcohol ink but the blue and the brown turned into a rather greeny messy looking colour. I was not a happy camper and as a result I just wiped it off and started over again.

Now you can let the marker sit a minute or so or immediately after colouring take a tissue and wipe the marker away. It will remain in the nooks and crannies and have an almost Steampunk look to it. The longer you leave it on the harder it is to take the marker off. If this happens you can take a bit of very fine sand paper and sand it a bit. That looks cool as well.

Not really all that happy with the turnout here but I used alcohol inks here and made an interesting butterfly.
This looks like it belongs in the dud pile but just want to show you more ideas.
And here the embellishment on the left is done with alcohol ink only and looks like a rusty key, just how I wanted it to look and the actual key on the right, which looks like I started to paint it for something else one time ago.
Last thing to do is trim your edges and remove the excess tin foil, then apply to an ATC, an altered canvas or any artwork you would like a different embellishment, just use Glossy Accents or double sided tape.

Thanks for dropping by and I hope you enjoyed this tutorial on Faux Metal.
If you have tried this and did something different let me know I would love to see what you did.
Sharing art is what it is all about.
Stay tuned for my next tutorial on Paper Casting the easy way.


.jpg)


hey Les i have dragonfly atc from you with this technique and it looks so realistic i thought it was silver....
ReplyDeleteCan you peel off the tin foil and paint it as another option?
What a great technique Les, Now where did I put my glue gun!! ;)
ReplyDeleteTFS
Jan x
This is a very, very cool idea. I can't wait to try it!
ReplyDeleteGreat idea Les.. looks like fun.. thanks for the tut.. hmmmmmm......lol
ReplyDeletelove it!!!
ReplyDeletewhat a great idea. thanks for the tutorial
ReplyDelete