Friday, April 22, 2011

A Bella Tag and an Inkurable ATC~♥~

Today was a quiet day around here, the sun was shining but the air was cool and the wind was not making it any warmer.
Hubs got the bicycle out then decided no it was too chilly, good thing because I was not riding and freezing, I have been cold all winter and spring is not coming any too soon for me.
I have a few things to show you but did not include them in my previous Gingersnap Fan Challenge, I like to try not to have too much to say when it comes to the challenges.
These few things are for other challenges but they are not linked back to my blog so I will post all these things right here for you to gaulk at. LOL
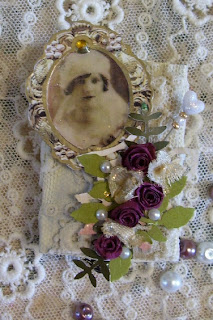
The tag is for a Bella Challenge using this beautiful lady with the hat image, given to us to use by Gecko Gals.
We were to use the image in any way we like but on a tag, so I used some phone book paper and attached it to a manila tag with Modge. Allowed it to dry which didn't really take too long. I then scribbled some purple and pink oil pastels on the paper randomly and then blended it with my fingers. I used a tissue to take off some of the pastel colour here and there to give some highlights to the background. I then used black stitching all around the tag. I then coloured the woman with some coloured pencils, her colours were faded looking. I used some black to accentuate those beautiful eyes. I added a hat pin I made and some quilled flowers. I stitched on the machine some tissue using a large stitch then gathered it very carefully then added some buttons from my stash. I also used some organza ribbon for the top. This was fun and loved all the colours and the stitching is what made if for me. Oh and I forgot after I blended the pastels I sprayed a bit of hairspray to fix the oils. Works like a charm and they stay put.

  My next item is a card for the Inkurable Stampers ATC swap that Sarah Schwerin is hosting. Sorry but not being able to link up but Blogger is acting up. You can find Inkurable on my sidebar and you can find all the deets there.
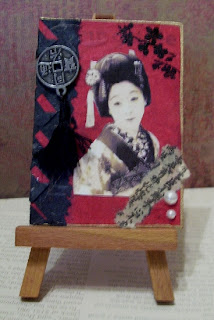
Back to the ATC. We are to use the 3 colours that the Blog colours are and so they would be orange black and white. Oh boy this should have been a challenge but after thinking about it awhile this is what I came up with. And of course you have to incorporate a stamp or stamps into the ATC. And you must make 9 of them exactly the same. Oh boy another challenge, I don't really like to make too many of one thing, that really doesn't make it all that original anymore one of my artistic motto's, never do too many of one thing and if you do change it up a bit so each one is slightly different. Not in this case.
I used an embossing folder on black card stock and then cut and fit it onto the slide then inked the surface with white ink. I inked a butterfly corner stamp using Black Soot DI then used a black marker to make a border. Using 2 different Studio G stamps I stamped the butterfly and the flowers in StazOn on acetate. I then added some stickles to the butterfly and set all 9 of them aside to dry. I then used Marmalade DI on the white background paper behind the acetate and spritzed it with water to make the ink run and move for a marbled and interesting effect. Set all 9 aside to dry. Then I stamped in black on white card stock 18 flowers and then coloured them all using orange colouring pencil and centers with black. I then cut them all out and wanted to stack 2 for each card for a bit of dimension. I put a piece of foam tape between the flowers to lift them up a bit. Then I added stickles to the top flower for some bling. I then assembled everything and this is what I came up with. Best part of all is I end up getting one in return.
I must mail these to Sarah soon as they have to make it to Australia where she will take all the ATC's from everyone and swap them so everyone gets a total of 9 cards back. And that is it for now. Thanks for looking.
I hope you all had a wonderful and meaningful Good Friday.
♥Blessings everyone.♥

GC99 Fan challenge

Hello everyone, I am again so excited to do a challenge over at Gingersnap Creations for the Random Redhead challenge, the theme being "fans".
I immediately took this challenge to a bit of a different level for me. I have a few blocks of Fimo clay hanging around waiting for something so I decided make a fan out of clay using stamps.
Well first of all I got a great book from my friend Becky (who doesn't have a blog yet but I have to work on her for that) at Christmas. Well I have scoured that book and looked it over and one thing really interested me was using your stamps to impress images into the clay. So I found an Asian Fan stamp in my acrylic collection and went to work. I put a little hole in the bottom of it to add a tassel to it later after it was baked.
I also made another project so I could use the heat in the over for something else and I will show that to you another time.
I got a number of these cute little frames at a Liquidation store and they were practically giving them away and that is really what inspired this whole piece.  The frames were a shiny almost skin tone ugly colour, poorly painted so I had a bit of sanding to do and gave it a facelift using black acrylic paint. When that was dry I took a piece of hemp and dipped it into gold paint then dragged it on the black surface. I also did some finger painting and smudged some of the gold. I then painted the fan gold after it was baked and cooled and then after the gold was dry I antiqued it with some burnt umber paint and then wiped most if it off leaving the paint to get in the areas where the birds were flying through the fan, if you can click the image you might see it better.


I then added some asian text tissue to the opposite corners on the frame, let it dry then attached the fan after making my tassel and added a little gem.
The Geishas were found in my stash today while cleaning up my craft area and it is printed on vellum so I put some white cardstock behind it to make the image show up better.
The measurements of the image area is 1 1/2x2 inches. Isn't this the cutest?
I have many more to make but next time I am going to bake the clay right on the wood surface. Stay tuned for a few posts later for that one.
Thanks for dropping by.

Friday, April 15, 2011

Mail today and another matchbox swap

First of all I would like to say I was so excited to read everyone's lovely comments that you left for the Geisha post and my little key tag post. I was so happy to hear I have inspired some of you and one of you hit Home Depot on your way to work and snagged some up this morning. LOL Jeanie you are unbelievable but am I surprised? No not at all !!!LOL
I am coming up on my 200th post and thinking I need to give something away but I will  think about that prize over the weekend and then post something to say thank you for following or visiting me. I certainly can't believe I have hit over 100 followers now and thanks to OWOH I have made a lot of blogger friends.

Today was a nice postal day, no bills, yeah, I got 2 swap items in the mail....One came from the UK and it was a Shrine from CraftyDawn  over at the Bella Creations. Recently I did a shrine tutorial over there and after the tutorial we did a swap. This is what I received and it is so lovely.
Inside the the shrine is a small pink button on the left and a tiny bottle with beads on the right. The detailing is just beautiful and so girly girl. Thanks CraftyDawn.

Next is a matchbox from Vintage Dragon Fly's FlickR group, the theme was Things with Wings.
Kim from the US sent me this gorgeous matchbox filled with charms, flowers and lots of heart confetti, a cute little birdie and some other goodies and look at that beautiful card on the right with the cherubs.
Thank you so much Kim. This is stunning and thanks to JoAnne who hosted this swap. Check out the FlickR group if you care to join, this swap it is for Canada and US swappers.

 And this next matchbox is for the group I host at FlickR The Monthly Matchbox Swap open to any who love to make and swap matchboxes.
This month's theme was Jeanie's idea and since the Royal Wedding and Weddings in general are coming up that is what our theme was, Wedding.
So my partner is Wendy over at Blissful Angels and I made this matchbox with some antique lace, the same lace that the box is laying on. You can't really see it on the matchbox because I covered it with an antique paper frame I found in my stash, added a gold border inside the oval and around the outside. Added a vintage bride image then applied GA to the image.  I haven't quilled in a long time so I had to practise making my quilled roses to make her bouquet( many roses later I succeeded) . I punched some leaves and ferns out, then I had a pick with tiny white flowers on it well they were too white so I soaked them in some instant coffee for a few minutes and voila instant vintage :). I added some pearls and then I added a pin with the heart and slipped on some gold and a pearl bead and stuck it in behind the bouquet. I have added some goodies inside as well. I hope Wendy completely empties it so she can see what is on the bottom. A little message I am sure every bride says the day of her wedding.

 And just another close up of my quilled rose bouquet. I really enjoyed making this so I hope Wendy likes it.
Thanks for dropping by and I so love all your comments.
Now off to get my 9 Inkurable Stampers ATC's done for an ATC swap hosted by Sarah Schwerin.
Happy Weekend everyone.

...

Thursday, April 14, 2011

A Home Improvement Alteration

Once you see what I made I am sure a few of you will be running to your local Home Improvement stores to find some of these. Just don't tell them I sent you and don't tell them why you need so many. You didn't hear it from me. LOL
I got these a while back and have been sitting in my stash along with piles of those paint chip samples.
These are samplings of countertops when you want to change your kitchen. They have a nice little hole at the top as well...hmmmm looks like something you could turn into something rather useful.

So what I did was turn them into key tags.
I used Modge Podge and put a good layer on top of the piece, then I cut a piece of scrap paper just a bit larger than the size of the tag. Put some Modge on the back of the paper as well and then lay on top of the tag and smooth out with your fingers to get rid of any air bubbles. Now put a thing layer of Modge on the top as well, again smoothing out the air if any then set it aside to dry. Make sure that all the corners are glued down, if not lift the corner and put some Modge there and press down and put the tag aside.
Do as many as you like.
Drying is important so be patient.
Now would be the time to get images, stamps out and any embellies you want to use. I didn't  use much in the way of 3-D objects because if these are to be used for keys it will get banged around a lot, but if it is for another idea then go ahead.
After the paper is dry, cut carefully around the edges. If the hole at the top is round, take a hole punch and punch it out. If it is oval take a good sharp utility knife and cut around the hole. Try to keep your cuts neat. That is why you want your paper to be dry.
Now take either a nail file, or a piece of fine grit sandpaper and sand all around the edges and even carefully around the hole. You just want to see the white of the paper, don't sand so hard you rip the paper. Again you really wanted to let that Modge dry well.
Now is the fun part.
Use Modge to apply images, other papers for a collage.
If using stamps, stamp wherever you want.
Add anything else you might like, words, etc.
One of the tags I used Glossy Accents and put some microbeads around the corner. Gives it a nice texture and the GA really adheres them to the paper.
Add a key ring, or split ring as I have here and you are done.
I think printing an address label and putting it on the back would make  great luggage tags, or use for kids knapsacks, gym bags, keys for a friend.
Just have fun and best of all these are Free!!!!
If you make any and would like to show me please do I hope this has been helpful and given you some inspiration.

Wednesday, April 13, 2011

Gingersnap Creations- Geishas

The GC97 Challenge is Geishas and if you know me I love anything to do with Oriental themes.
I have made a Geisha ATC for the challenge.
I have used handmade papers in red and black. The black on the LHS is cut and folded to form little folds in the border. I have also stamped and embossed in black some small flowers from a Studio G stamp using Black Soot distress ink. I made a tassel from black embroidery floss and attached it to an Asian coin. The bottom strip is a piece of tissue with some oriental characters on it. I also thought to add some pearls for a final touch with an added Gold Gelly Roll pen to make a fine gold border around the ATC. The lovely Geisha was found somewhere on FlickR.
Thank you for looking my dear blogging friends.
Now for my next post which will surely get you running to your nearest home improvement store.

Wednesday, April 6, 2011

MOO's ,Flowers and a matchbox

I haven't posted in a few days and realized how much time really slips by when you are having fun.
My friend Kathy recently asked me what a MOO was and I didn't really have an answer for her because I knew about them but had never made one. So of course I had to go look at the site Make a Moo or Two and found out what they are all about. Much like inchies and ATC's they have a required size which is ......
"A Moo is a little card sized 2.8 x 7 centimeters, or approximately 1.1 x 2.8 inches. Beside this fixed size it is what you make of it! Choose whatever materials and techniques you like and show us how you worked within the theme". Well I am not about to embark on making them for trade, but.....I thought what a nice little thing to put in with trades I was going to send out with my artist info on the back. Moo's are great for using up those little pieces of paper you hate to throw out or small images or pieces you know you will eventually need. So....here are a few that I made using bits and bobs out of my paper stash. Of course no task goes by without an Asian theme to it. The Asian one I made using a used teabag, emptied it, dried it then stamped some bamboo leaves on it. The others I have used transparencies, stamps and images.


Next photo below are some flowers I made using Tim Holt's Tattered Floral die. I have a Cuttlebug and just love cutting and embossing things for my art.
I was given some handmade papers a while back, I believe Kathy, and, never used it til now. Even the black flowers look stunning.Nothing like a little paper, brad, some water spritz and scrunching to make these lovely florals.

And this is the matchbox for my trade partner over at The Vintage Dragonfly matchbox swap for US/Canada FlickR group.
This first swap was Things with Wings. I just love this woman image so I added some transparency wings I printed off and coloured with Alcohol inks and some Stickles. I love the greeny blue that I got from the 2 colours I used.

I had not blue or green beads so I just added a couple drops of alcohol ink using Stream to the clear bead and it just make the beads pop.
And I also filled it with mostly things with wing related items and a few other bits and bobs.
I stamped the back with an image and the inside bottom of the box also has a message.
Sure hope my partner likes it. I love making these transparency butterflies. So much fun and you can custom make them to your own art.

Well that's it for now.
Thanks for dropping by
Related Posts Plugin for WordPress, Blogger...