Showing posts with label altered. Show all posts

Tuesday, July 10, 2012

A Couple Altered Tags

Hi everyone,
on the weekend I was playing with some shipping tags and thought I would share with you what I made.
I used Distress inks for the background, white acrylic paint, Stickles, dripped and dabbled Ditto Shimmer sprays (they have a nice shimmer to them), added some glossy accents, dyed some seam binding and gathered it on the mermaid tag.Sea shells, and micro beads were also added.
I miss doing tags and ATC's so when I do them, I really go for it and enjoy it quite a bit. I think because they are smaller canvases and they don't take days to do, although some ATC's I really think about them for a while to conjure up an idea.
This tag is for the Yahoo group Gecko Gals Paper crafting Group, Bathing beauty challenge. I just snuck her in on the deadline.
I used a bit of sandpaper at the base to give some texture and interest. And a real mini sea shell on her head. I also coloured her bathing suit with pencil crayons and gave her some rosie cheekers.

 I still need to think of something witty for this one. I am thinking something about turning into a prince if you kiss me.....I know weird sense of humor. I am in a tag swap over at Tee's The Altered Paper later in the month which prompted both these tags so this one is probably going to my swap partner, not sure who that is yet but it will be fun to send. 
I am also working on a mini hutch my hubs was able to bring home free from work. It is old and has been around the block but he salvaged it for me and thought I could put my piles of craft supplies in it. I think he was hinting to put it away. Being in a small house, space can be limited but I need to keep it all together and more organized, so, I am all finished base coating it so just thinking what to put on it for design. I need to finish it up soon. I have to start painting for my shows and need to start a little earlier this year.
Thank you for stopping by.

Friday, May 18, 2012

I was featured

I just got an email from June of Dezinaworld and she has featured my mini canvases using her Steampunk images. My canvases were 2x2 and I made them into magnets. 
I can't thank June enough for featuring me. I know this is small potatoes to some but I am just GAFFED!!!
(Love my new word) Here is the link, go check it out...
Off to bed...no face tonight :(

Altered Key swaps received

My Blogger friend Tee has a wonderful swap blog called The Altered Paper. Tee has something always going on and if isn't a swap it is a tutorial or helpful information regarding craft and paper arts.
Tee hosted a swap called the Altered Key and we were to make 2 keys then we were assigned 2 partners. So I received one key from Elysia last week and here it is, it is just wonderful and I love the feather attached to it, the top feather she sent me along with some other neat goodies to use. Thank you Elysia.


 And next are 2 keys from Amy, she made these wonderful keys then sent them to me in this jean pocket. And I was also sent a rather large supply of goodies. I was gaffed!!! Thank you so very much Amy.
..
And stay tuned for my next post.....a big announcement....

Wednesday, March 21, 2012

Did you Know?? alcohol ink tutorial, a fight with paint and......

Seems to be of late with nice weather my posts are few and far between and when I do have something to say or show you it is long winded.
I wanted to show you this quick tutorial on " Did you Know" you can make your own alcohol ink for a fraction of the cost of retail ink? Well I am going to show you how easy and affordable it is.
I bought a package of markers in the kids section of the dollar store, they do not have to be expensive Sharpie brand, you can use ones that are starting to dry up but not totally,  I bought a package of 24 for 2.00. The package contained 2 different values of each of the colours, so in this tutorial I will use 2 markers in yellow but different shades of yellow but it will still be bright enough for your projects.

What you need.....markers, scissors. alcohol, I used 50 percent because that is what I had in the bathroom but I would suggest a higher volume like 70 or even 99% if you can find it. 50 is OK but takes a bit longer to dry. The higher the percentage the faster it will dry but a heat gun comes in real handy, OK, small plastic containers for your alcohol ink, I got a package of 6 at the dollar store, and if you have forceps or tweezers then you are good to go.

 Take your tweezers or forceps and grab the plug at the end of the marker and pull it out. It may take a bit of a twist but gently remove this, then toss in the garbage.
 You may want to use gloves for this part, I didn't but maybe should have, now you have this felt piece covered in plastic that contains the ink part of the marker.
 You are going to cut this up in pieces that will fit nicely into your container. You can see the different colours of yellow but ultimately it will be yellow and fairly bright...yeah.....
 Next, pour your alcohol over the cut up pieces .....
 I covered the pieces so that it is over top of the contents and then start to swirl the alcohol and nibs around and you can see the colour start to come out. Leave these nibs in, place the cap on the container and I leave it for a few days. you can leave them in or completely remove them but use your tweezers and squeeze the alcohol out of them, then discard in garbage.
 I haven't had time to make proper labels yet so I used tape for now, make sure you put the lids on securely. These are not in a dropper container like the store bought inks but I use a q- tip for now to apply the inks to my projects with a little alcohol just like you would with the store bought brands. I need to find an eye dropper , it would make this so much easier to apply to my projects but I will have to keep my eye out for one....no pun intended. LOL 
 And here, this was done quite quickly so I just wanted to show you how they look. Next time I will only stick to one colour, I used Turquoise and pink and got a little carried away with the blending, it looks a little muddy but you can use alcohol to move it around.
I hope you liked this tutorial and hope that if you are like me, frugal is not a bad thing, I hate having to save and save or wait til the budget permits to buy 3 alcohol inks in a package for only maybe 2 I really like, and, this way you can have a lot more colour variety if you are not totally into the grunge factor.
If you make any of these, I hope you will share what you made or what colours you used. I would love to hear your feedback.

And.....I made another domino book for  a challenge over at the Yahoo group by Gecko Galz Papercrafting group. Leanne provided domino sized images for us to use so I decided to make a book with them. Since I am a little fond of books I wanted to make one and perhaps this will be a prize for an upcoming celebration. You will have to wait and see.

 I did an accordion fold, I used black card stock then I applied gold ink to the edges of the paper, then I cut the images, edged them with gold gel pen then applied to the black paper. I used a nice organza ribbon with gold edges on it to tie the book closed on both sides.

I love challenges, I never know what will transpire and that is what makes creating for me so much fun.

And....have you ever had a fight with paint???.....looks like I lost the battle here...
How did this happen you ask??? Well another frugal endeavour making my own glimmer mist with Folkart Metallic Peridot paint....I unscrewed the cap to find there was a sort of dried up glob at the top of the bottle, I pulled it with my finger and before I know it the paint is all over my hand....never had a fight with paint before.....did I get my glimmer mist made...you bet I did and it is wonderful. Love it but hate the price so me being frugal and don't mind making my own things I have to say I am quite impressed.
Til next time my friends....stay crafty and beware of your paint......

Friday, March 9, 2012

Mini domino books and 1x3 trade cards

Hi all, well I have done a little tidying up from things piling up on my table. I was involved in a private trade and finally got everything done and sent off today. I joined a new swap blog and I will give you links to all the blogs involved in my post as I go along.
This is a little long winded so be warned.

First up I wanted to share this darn cute birdie mini domino book I made. My friend Becky had sent me some mini dominoes late last year and I made some necklaces with them but after doing a few large domino books and I really enjoyed them, I thought, why not do a few minis and then I can send them to swap partners now and again with my trades.
Since signs of spring have been on and off the last week or so with some warmer temps, birds starting to return and the days are lasting a little longer I was inspired to make this mini bird book.
So here is what it looks like, click on the pics for a larger view if you have trouble seeing some of my details. These were fun and so very addicting.
 Below is a regular size domino and the little one is the size I just finished making, cute huh? I alcohol inked them in my fav colour and it reminds me of spring and all it's new growth.

I used scraps of paper, I found a bird charm, how lucky was I, thanks to a past swap partner I think was Smifferoo aka Jan.
I punched out some black paper for the holes and then put a white gel pen to make it a shadow and then used pencil crayon on the outside around the one side to make them pop so the birdies can see their way in.
 A bird eco shape and egg print from Artchix Studio with some burlap
 A sticker word, music paper from a hymnal, a tissue paper bird fussy cut and a chickadee stamp
 Rub ons, Artchix German scrap, love that stuff
 another rub on, an inchie bird stamp cut out and a definition of bird from a dictionary used just for art.
And tied together with some nice gold cord

Next up is another domino book that I made for St. Patrick's day using some free images from Leanne Seeds blog, Fripperies and Butterflies, and as I told you in a previous post, I will be a guest artist come this August for her Gecko Galz digital scrapbooking store.
If you go to the Fripperies and Butterflies blog you can snag up Leanne's free images.
When I saw these I knew immediately I wanted to make a cute mini domino book.

I didn't have any shamrock paper so I made myself a shamrock stamp out of fun foam and stamped my scrap paper with Peeled paint and stamped shamrocks on it. I made shamrock shrinky dinks. I messed them up a bit with my gold paint pen but hey, being that small it's hard to get precise.
I used some known sayings for St. Patrick's day, nothing to long so they would fit on the tiny pages.

This is the front. I had to crop and fussy cut the images so they may look a little different than Leanne's original images on Fripperies and Butterflies.

 And this is the accordion fold out. I even put a little Stickles on the brim of the hats, you can't see it but I just had to make it sparkle. I also added a nice gold sticker border around the outside, it almost looks like it was soldered. I think green and gold just naturally go together. 
Thanks Leanne for making this such a fun project for me. Can't wait to do more.

And last but not least, I found a new swap blog called Tabby"sSwaps, hosted by lovely Kim.
This month they are doing 1x3 cards in the theme of Vintage Children.
These were fun, and quite quick. There isn't a lot of room to play with.
I did do one digital image with Gimp brushes and a cute girl from FlickR.
I added a neat puzzle sticker over one of my cards, you may have to click to see it up close but it is very interesting. Might have to use them a bit more often.

Well thanks for sticking it out and I hope you have a lovely weekend. It snowed today but it won't last long now. We can only hope for warmer days ahead.
TTFN

Monday, January 23, 2012

Calendar pages complete and a Mixed bag of goods

As you all know I was doing calendar pages along with Roni over at her blog Ink stains with Roni. I have completed all of them now and want to show you the rest of them. I enjoyed making this project, I learned some new things, made myself something for a change and got a much needed calendar. Although this one I won't be able to write notes on it for myself but I can enjoy it just the same.

Although August isn't usually fall colours yet but being in Canada we actually see subtle changes coming in late July. 

August- Melted Crayons...I liked this technique
 September- Stamped Gesso
 October- Distressed Glue
 November-Molten Pigments: ie I didn't have pigment powders so I scraped chalks into my glue
 December-Sparkle Mosaic Stamping: I didn't have scrap rubber so I used fun foam
 So there you have it....I am really pleased for the most part. I have decided to start an Art technique Journal and put scraps of paper that have been clipped from each calendar page and write down the technique. That way when I want to do something again I have it handy. Another goal for this year.

And....more stuff, are you bored yet???
Over at Helga's blog My Artistic Life, Helga gives a tutorial on how she painted a background which I applied to my little hearts.  Here are a couple little Valentines to show you how I made mine. I used chip board off the back of a 12x12 paper pack. I cut out hearts, punched holes at the top, painted them using the following colours...Delta Apple Green to splatter, Americana Baby Pink, Americana Canyon Orange and Delta Cardinal. I pounced instead of brushed on my colours. First  I gave my chipboard hearts a coat of gesso. I punched an inchie punch out of scrap and used the window to draw it on the heart and cut it out before I painted, I Painted the heart back and front. Use heat gun to speed up drying. Then I print and cut images a bit larger to fit over the window on my heart. I then added grommets to my heart to put ribbon through. Covered the back of the heart with a smaller shaped heart from designer paper with pinking shears so I can add To and From. Aren't they the cutest? I am not usually into Valentines but for some reason this triggered it....thanks Helga for some inspiration.
 Click on the images to get a good close up of the colours, they blended so nicely with the pouncing I did.


 And....there's more....wake up.....
These are some bamboo tiles I got from a kit I ordered a while back from Artchix Studio. The kit contained a sheet of images, a few bamboo tiles. I won a challenge on Facebook back late summer so I finally ordered a few things and used my coupon. I am addicted to these suckers. I posted on FB I was looking for place mats and lo and behold my Mum found me some and I was able to locate some locally but I will wait till Mum's arrive before I set out for more. There are 130 in one place mat. They come in black, natural and a walnut colour. wooohooo, I love these. My dictionary pages are getting cut up as I am cutting words out of it and adding to some. I used ball chain to hang them and I experimented and coloured one ball chain with alcohol ink and I was amazed at how wonderful it turned out.
I must thank Jenxo who sent me one of these
 along with a swap we had over Christmas, it sparked  ideas. I have received many comments on it and I plan to sell these in the fall. They are so addicting and you could put many things on these besides images. Stay tuned as I have so many ideas for these I can't stop....


And last but not least some wooden puzzle piece magnets. I loved that heart colour I did a couple puzzle pieces. Added some images I had on the computer, found a few quotes online and added some either bling or Stickles for interest.

Thank you for bearing with me during this long post.
It is raining here when it should be snowing so we are on high flood alert in the basement.
Til next time, stay crafty my friends.

Monday, January 16, 2012

More Calendars, an ATC and Hearty goodness

I have had these few calendars done since late last week but with Blogger acting up and things going on around here I am only getting to these now. The days are flying by so my calendar will be put to good use very shortly.
Here are the following months......
May-Colorized bleach....I think this is my fav technique so far.....

June....Gradient Stamping with a Twist
July...... Bubble Wrap Emboss Resist
August Calendar will be coming soon, I needed to buy Crayons for that one..
Remember to take a peek over at Ink Stains with Roni for all of her techniques. You can find all the Months on her Right side bar. This is a lot of fun.

And here is a challenge for Bella Creations in the OhLaLa group.
Heather gave us a Gecko Gal Bingo card image only to work with.
Here I did some Gimp (Image Manipulation), added the B/W girl image and coloured her, added butterfly wings, then replaced the O in Bingo with a Gimp brush.
I inked the edges with Jumbo Java Ink by Tsenko then pleated some pink ribbon and seam binding together, added my little safety pin and charms. Overall this was a good challenge for me to use Gimp and get more practise. I am coming along but I am no where near a Graphic Artist....yet...

One more little ditty.....
On Artchix, Helga gave a little tutorial for painting hearts using their Eco Shapes. I didn't have any on hand so I cut my own hearts out, made an inchie window, painted with similar colours that Helga used. I think they turned out pretty spiffy. I love the slip slap of paint and blending right on the surface. Of course I used a good scruffy brush for this then I used a toothbrush to splatter on the Apple Green. Love the combos here.
Thank you for dropping by.
I can't remember if I posted but the car is fixed, many dollars later but I am up and running.
It was covered in ice from last weeks ice storm but it is OK now and I am a Happy Camper.
Keep arty my friends.

Wednesday, January 11, 2012

Art by Wendy Giveaway

I recently met a "new" Blogger and her name is Wendy. Wendy does some incredible painting and is celebrating her first giveaway here.
Here is a pic of what you have a chance to win. Check her out, say hello and maybe become a follower.
Here is a peek at what she is offering as a prize.....cool huh? and she even posted a tutorial on these little gems. Might have to make me some one day.....cute cute cute.

♥

Monday, January 9, 2012

Ink Stains with Roni Calendar

I told you in my post 2 posts ago I was doing the 2012 Calendar with Ink Stains with Roni and wow, I am having fun.
Over the weekend I got all caught up, Roni is posting a calendar each day with a technique background. If you wander over to her blog you can follow along, make a calendar for yourself or just use the techniques in your artwork. Some of these are new to me and some are not, but, as you may know me, I do with what I have on hand and may even throw in my own version. Roni has all the month techniques posted on her right sidebar to find the month that has been done. I will wander over after I post to see what  the month of May  is all about.
I already showed you my January calendar here...(scroll down to the last picture for January), and. here are the the months up to April.....

February is called Floating Starts technique

 March is Wax Paper Die Cut but I cut my own shamrocks by hand, I don't have a die cut. This was tricky....argh
 And April is Reverse Grid Stamping Technique

I have been using up borders I punched out from other projects, some mini images that I had printed off, I am digging out supplies I have stashed away and I get a calendar out of it. How fun is that????
Lesley is a happy Camper.
Stay tuned for more months to come and don't forget my Giveaway

Sunday, January 8, 2012

Help Me Celebrate 300 Posts....

I cannot believe I have reached this milestone and it is all because of YOU.
I started this blog because I wanted to share what I did with like minded people and of course meeting new people is something I have really enjoyed.
So here is to my 300th Post and to celebrate a little Giveaway.
As you know there is always rules for giveaways but you don't have to do any of these except leave me a comment.
I first have to tell you I redid my Giveaway Banner to include the link directly to this 300th post in case I post other things before the draw so if you have already posted this on your blog, please remove it and snag the new one with the direct link.
Rules because hey we need a few.....
1. Leave a comment
2. For an extra bonus place my Giveaway button on your blog
3. Post about my giveaway and leave me a comment so I know you posted about it and you will get a third chance
4. If you are not a follower and become one you get another chance, I would really like to reach 200 followers this year so that would make me really happy.
5. If you  know or remember my Cat's name you get another added chance to win.
And here is what you will receive, what you see is not necessarily what you get because the pile is already growing. There is even a little baggie you can't see with bonus items in it.

Papers, one of my key chains with ring will be provided, one of my shabby Angel hangers, the pic does not do this justice, sorry again I am no photographer. Burnt and painted glue butterflies, altered clothespins with butterflies to put on packages, give bags ie you can clip your birthday card to a package so it is all in one place!!!!, Artchix images, a couple mini dominoes so you can alter them yourself, some wood jewelery items from Artchix, apply an image and attach to a chain or your artwork.
 Here is a closeup of these altered Clothespins, I gessoed the pins then applied washi papers to them then added the butterflies. So addicting and they really transform those brown boring pins. New Addiction
 The picture does not do this any justice. I got this image free on Fripperies and Butterflies. I have just recently made a few of these little ATC sized fabric hangers. I added some vintage lace, (thanks Mum) satin ribbon adorned with a brad pegs removed with lovely pearls. I made the hanger and painted these mini clothes pins. I made a few of these at Christmas and they were a real hit. (Thanks Nancy for the inspiration)
                                                        
 And of course my Key fob made from counter top laminate samples (thanks Home Depot and Loews) LOL
The ring will be provided for you to attach, it is easier to send separate for shipping.
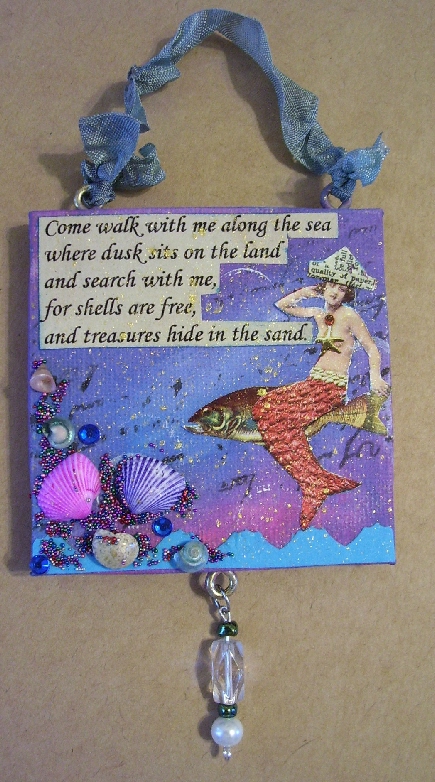
 And I was so excited to do a mini altered canvas with an Artchix mermaid image, the verse came with the images, shells from a swap and I added the crinkly ribbon and some micro beads, and.....I also made the dangly bead hangy thing on the bottom. Love how these turned out.
So there you have it. Like I said I am adding more as I clean up around my kitchen table studio and bins under the bed and stashes all around. LOL
Thank you to all who have commented and have become my blogger friends. Where would I be without you...probably not blogging.
Good luck, you have til January 14th to comment. I will pick the winner on Sunday.
Remember if you do not have a blog I will need to get in touch with you so please leave me your email address or some way to contact you.
Thank you so much Everyone!!!!!
Related Posts Plugin for WordPress, Blogger...