Showing posts with label paper. Show all posts

Sunday, December 9, 2012

paper circles and buttons...oh my

Well I have you guessing and I bet you still don't know what I am talking about.
I thought of this after receiving a wonderful ornament swap from my friend Cathy over at TolenTreasures blog. Cathy is a very talented lady and can tackle almost any task. She makes beautiful penny rug runners and  ornaments and I thought well why not make some out of paper. Although there is no sewing at all involved but I thought how cute would these look tied to a Christmas gift or a few on a simple country Christmas card. This is just how I made mine and I wanted to share how easy and fun they are, and, a good way to use up those scraps you hate to throw out.

What you need, scraps of paper, ink pad but not necessary, scissors, a fine tip black marker, I used paper buttons because I have a die I use in my Cuttlebug but you could use real buttons or some other embellishment, a hole punch if tying to a gift and some string.

I used containers to make my circles and traced around them on my scrap pieces of paper and cut out. 
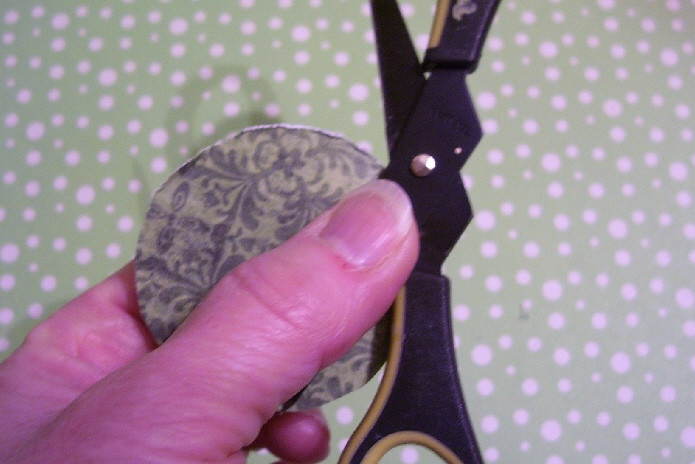
 If you want to ink your edges of the circles do so now, I forgot to take a pic but you know how to do that then take the scissors, open them up and run the inside of them on the edges of your circles to distress the paper but not tear it. I like how it almost gives the look of fabric to the paper..do this to all your circles.
 Now take your fine tip Sharpie black marker and do a faux blanket stitch all round the circle. I came in just a bit from the edge so it looks like it has been sewn. Do this to all circles.
 Next, glue small circle to large the add your button. So fun and easy and don't they look so cute. Some of the buttons I put off to the side a bit on the inner circle to make it look a little more handmade and not so perfect.
 Then I decided to make a few tags and added To and From on the back, I will punch a hole and add a bit of bakers twine and add to my gifts. As mentioned above you could make these a bit smaller and make a lovely card. Don't limit yourself to Christmas, make any occasion with different types of card stock. I will add that the heavier card stock I like the best especially when distressing with the scissors. 
Have fun and hope you enjoyed this little paper penny tutorial. Fast easy and oh so cute.
TTFN ♥♥♥

Friday, December 7, 2012

A quick and easy ornament

Well I finally got the pictures taken and a few minutes to show you how to make these cute and easy ornaments.
What you will need is some snowflakes, I got mine at Dollar Tree (yeah Canada now has Dollar Trees), these came 10 in a pack and they have glitter on them but there are several varieties to choose from.
You will need scissors, a circle punch, mine is 1", hot glue gun, vintage or even small images from past Christmas cards, a strip of 12 x1 inch paper strip and a small square for the back of the rosette you will be making from the strip. 
 Take the 12x1 inch strip of paper ink the edges  and  then score it every 1/4 inch, then accordion fold it to the end. Attach the ends together making sure your valley folds and peak folds line up the glue in place. 
 Now press the circle down and push it in to form a rosette like shown below, you actually need 3 hands at this point but don't get discouraged it is well worth it in the end.
 The side you want face up on your snowflake lay face down for now. Get your square piece of paper and hot glue gun. Made sure you work on a surface that you won't damage with hot glue, a non stick mat or whatever you are using. Squirt some glue down into the hole then quickly take that square piece and place it over the hole. This will help keep the rosette together. I usually have my hand on the rosette but this was all done so I could take the picture to show you how it looks on the back side.
 Flip over and now you have a rosette. Vintage looking isn't it...now for the fun part.
 Add some hot glue to the piece of square paper on the back, stick to the center of the snowflake. Add your image to the top and any more little embellishments you like. These images are found around the net copyright free. Make sure your hanger is at the top before gluing everything in place.
I have done a few of these with little children's faces from Magic Moonlight site and some from FlickR etc. Use your children's faces, pictures from old photos, old postcards, past Christmas cards with tiny images. Add to packages or hang on the tree. Ornament exchanges, swaps etc. So easy and even the kids could help. How easy and frugal and they look so nice. 
Good craft show sellers as well, believe me they sold!!!
Enjoy.


  And this 8x10 canvas I taught a class at my community library on Thursday night during the 12 weeks of Christmas craft nights. It was inspired by the talented mixed media artist Christy Thomlinson and we had a blast. The girls really enjoyed this and we used, paints, stencilling, text pages, scraps of Christmas papers, water colour crayons and fonts from the computer. Each girl used different papers and loved using sequin waste for the first time and were amazed at how easy and effective this was. I even gave them an extra canvas to take home and make another on. It was a small class and we had a blast. A good time was had by us all. 

Thanks for dropping by....... and what can one do with paper circles and paper buttons?....
Stay tuned for our next Christmas quick tutorial. 
♥♥♥

Tuesday, December 4, 2012

Paper rears it's head

I didn't say ugly either. I have really missed playing with paper and this time of year I especially love creating cards and tags to top presents and to add to little things I send out.
Today after helping at the retirement home luncheon, I thought it would be nice to start a few things. I am sending out painted ornaments to the girls on our Friendly Palette group. We exchange ornaments yearly and we are building up quite a collection of each others little works of art. It's fun seeing what we come up with each year.
I decided on making some tags to go along with mine and I still need to add a bit of ribbon but these I thought were really cute. I got some stickers from the dollar store that were kind of Primitive and rustic looking. I did the spray ink on my work mat and smooshed around the ink on the tags, added a circle of paint here and there and inked the edges of the tags and they were done. Cute and quick. I hope the girls like them. 


  And I made a couple of cards for some recipients, these are 3D cards,  you add  dimensional tape to raise parts of the image. I used gold glitter and some gold corners. I got the blank tag cards from Michael's, I really like the look of these. Good thing I bought 2 packages. These Santa's were purchased locally from Ecstasy Crafts which is just down the road, a much too convenient store but it has quality and European designs which you can't find just anywhere.

Well it has been a full day.
I must start my shopping this week and get that last order done before my customer calls in a panic. I need someone to cut the wood length for me and if I can nab him before he goes to work tomorrow afternoon we are good to go. 
Take care and just wanted to let you know I have made a Facebook page for Harmony Road Studio so you can follow my arty doins  there as well.
TTFN ♥♥♥

Friday, October 26, 2012

craft class complete and....

Some more painting to show you and craft items.
First of all last night was my night to teach the stocking class at my local community library.  The library planned a 12 weeks of Christmas program and so far it has been a huge success. 
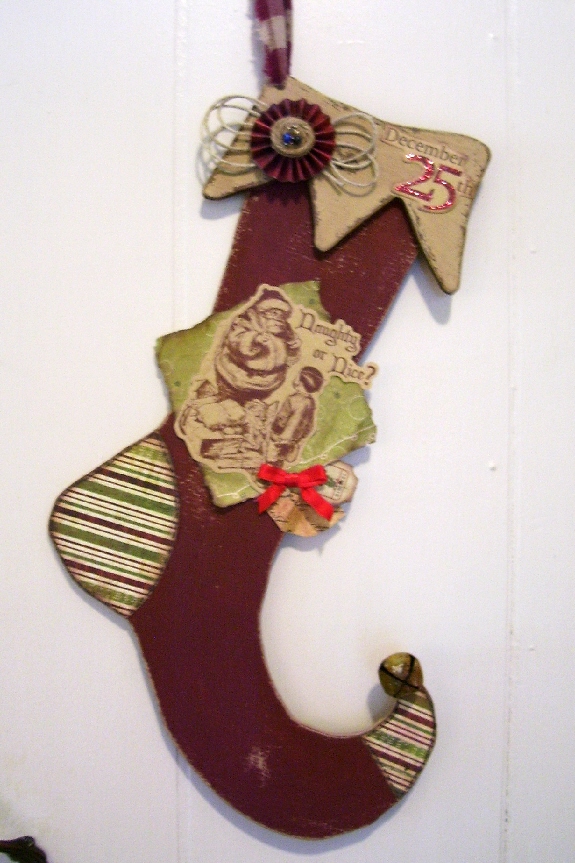
Last night I did my wood stocking with painting and scrap paper and a few little embellishments. I showed you the stocking a few posts ago and here I will share a couple photos I took last night....everyone really enjoyed themselves and the stockings turned out wonderful. Each one was a bit different and I really enjoyed the looks on the ladies faces after they completed them. 

Some of the girls taking a break, admiring and finishing up. A good time was had by all.
 Happy faces and a look of accomplishment. Art is fun.
 A close up shot of one of the girls. We struggled with the paper for the heel and the toe but we finally got it the way she wanted it to look. 
And lots of things finally piling up. I had this done before I had to go out west. This is a Terrye French design, the pattern was purchased on the Painting with Friends site. It was a lot of fun and I knew I had these in my stash for a reason. Only took me a few years but when I saw this pattern it fill the bill.

 And working on my gourds. This year my gourds are a little larger to work with. This little fella has cut out stars and a battery operated tea lite inside. You can barely see the light but it is better in the evening. I added a bit of snow on his nose but I think he needs some on his hat as well.
 And here is Miss Snow Flake....isn't she darling. I found some scrap polar fleece in my stash then went to work on the colour theme for this one. I just love how she turned out. If she doesn't sell I will be planting her somewhere in my house over the holidays. Chances are if the gourds did well as they did last year, she may not be around long. I am also working on cat gourds and Grinch gourds.....stay tuned for more of my Gourdy Folk. 
 And a few weeks ago I found some beautiful sparkly snowflakes and I had no idea what I was going to do with them but I grabbed a package because soon Christmas things will be flying off the shelf. I must go get some more as I really like how these turned out. They were a total freak ornament. I had made a rosette for something and it was too big so I placed it on the snowflake and said wow I like this. then I found some sticker snowflakes and placed that in the center then placed a rinchie on top. As you can see one of them has a tiny bow for a splash of colour. They were so quick and easy to do. I have some vintage Santa's I will be making later this week. My first show is next weekend so I am really starting to get revved up. 
Thank you for looking and also thank you for your condolences on my Father's passing. I cannot thank you all for your prayers and thoughts, it is really helping me through these rough days but I plug away and I have many memories to cherish of my dear Dad.
Til next time.....♥♥♥

Friday, October 12, 2012

Flying paint and lacking mojo.


Hello friends.
You probably thought I was lost in space....no actually I am planted on my chair in the kitchen studio trying to get my mojo going but it is really lagging lately. 
Here are some things I have ready for my shows.
This is a wood salad bowl. painted by me of course, this is a Cyndi Combs design. A wonderful designer and painter and very easy and quick patterns to do which I like this time of year.

 This is for the Retirement home. I help my MIL and her friend serve lunch once a week and I asked them if they would like me to do a little prize thing after Thanksgiving. We didn't serve a meal this past week because here in Canada we celebrate it earlier in the US. Our Thanksgiving was earlier this year for some reason. So this will be draw a name kind of thing in the next few weeks as peeps will be starting to decorate for Christmas. this is a Monika Brint design which I added music paper wings just for something different.
I think I will add some Stickles to the Joy, it needs a bit of bling.

Here are some paint stick ornaments, you can find the tutorial here at Today's Fabulous Finds.
This idea I got from Pinterest but I did my faces a little different. Cover a styrofoam ball with air dry clay the marshmallow type, oh and I pushed a wire loop hanger through first then cover. Let dry. I then added white acrylic paint so I could paint the facial features on there. Added air dry clay noses and add ribbon to hang. These were so much fun, easy and the only hard part is waiting for the clay to dry. I hope I sell a few of these, if not, I will hang them on my tree.
And last but not least is the Tyendinaga Library 12 weeks of Christmas project I will be doing in a couple of weeks. This is a wood 1/4 inch plywood stocking cut out by me. Painted and distressed and added some scrappiness to it and I even rusted the jingle bells.
Well that is it. I had started this post earlier today but was cut short due to many phone calls and trying to find out more about my Dad's condition. 
Take care all and I will return in about a week.

Wednesday, September 26, 2012

A Little Weenie Giveaway

Hi friends
well I have been busy painting for my shows and now and again I get itchy fingers to do a mini mixed media. This latest one is done in the theme for Hallow e'en and I am going to give it away to one lucky winner.
This is a 5x7 canvas board and is an original OOAK piece by me. Who knows maybe one day I will be famous (NOT) and you will have one of my treasured originals.
All you have to do is post a comment. If you are already a  follower or  become one, let me know in your post and you will be eligible for a 2nd chance to win. And if you also post my little button on your blog and tell others about my draw you will get your name thrown in for a 3rd chance to win.
I generally do not do much in the way of  Hallow e'en. I live in the country and we get, if we are lucky, 3 kids. We don't have children or grandchildren so it is not something I decorate for. I do like costumes and fun things related to it but it is not one event I plan for.
I will include some things along with this canvas but perhaps not Hallow e'en related but items you can use in your art. If you have seen my giveaways before you will know I like to give.
So sign up and get a chance to win.
I must slip away to get a button made so hang in and look for it along my sidebar.
Name will be chose on October 4th. I will not be doing a giveaway til probably again in December because I am busy getting things done for my shows.
Thank you everyone who follows and leaves me lovely comments.
Take care and good luck.
BOO!♥♥♥

Wednesday, September 5, 2012

Fall is in the air.....

Hello blogger friends. 
Are you feeling the nip in the air in the evenings? We sure are. The days are getting shorter and the leaves are starting to change colour. 
I have just a few things to show you then off to settle in for the night.
I am doing a fall tag swap over at Tee's blog, The Altered Paper and I wanted to do something very different. If you follow me regularly you will know that I like to dabble in all kinds of mediums and for this tag I chose to do some air dry clay work on a tag that looks like a tight basket weave. Someone once sent me this piece I think it was sample wall paper or something but it fit the bill I was looking for. I wanted a natural theme for my fall tag so this is my base. I got a leaf from outside and traced cut around it on my rolled out air dry clay. I cut a hole in the center and after making a face from a mold I have I popped it in the hole and the clay has a sort of self healing property to it as it is very sticky at first. 
I let it completely dry then I gessoed over the clay, then I painted the leaf and face in fall colours. I stamped some leaf stamps and coloured them and popped them on the bottom corner. You can't see here but I had a bit of white ribbon with brown and orange dots on the bottom as well. This turned out great I hope my partner Ginger likes it.

 And as you  know I am busy getting ready for my fall craft shows and since I took this design to the library I thought I would do up another one. Birds are always popular in homes. I don't really make very many of the same design but this was so quick and easy to do. I like painting on canvas a lot. No buying and cutting wood, sanding and all that mess and prep work. Paint and go with canvas. This is a Terrye French design.
 And lastly while everyone around blog land is busy with Hallow e'en I am busy with ornaments for the show. I don't do shows before Hallowe'en and I am really not into it too much although I like looking at other people creations and it just not one of my favourite holidays. These ornaments are Cyndi Combs designs. She makes really cute and quick ornaments.
Well I am also trying to squeeze in a bit of time with mixed media canvases. I just had a brainfart about something to try with my whimsy girls and it looks like it will work. Stay tuned and if I get some time I will finish it up and post it later in the week.
Well off to bed soon.
Take care and stay creative.
♥♥♥

Wednesday, August 29, 2012

Another mixed media and happy mail

Well I managed to get to the library and dropped some art off and I can't tell you how excited and proud of myself for seeing my art displayed on the library walls. It was so exciting. I can't thank all my blogger friends enough for believing in me, nourishing me with their knowledge in art and encouraging me and inspiring me to try new things. 
On that note, here is a little mixed media canvas I did  Monday night to take in and this will be displayed by my profile page the library was going to do to introduce who I am. I call this "Discover" it has special meaning to me, I am discovering my drawing abilities. I am discovering I am an artist. I am discovering I have boundless creativity. This drawing has been in my sketchbook for quite a while and I finally broke free and applied colour to it and I am so happy. This piece is not for sale but I told them at the library that I will do some on request or something similar that no two pieces will ever be the same. Mixed media is not a big thing here yet, seems  in my area things take a long time sometimes years to become popular.

 And I am so excited to receive Happy Mail from my blog friend Tee over at The Altered Paper.
As you recall from a previous post that Tee and I did an easel ATC swap. Neither Tee nor I had done such an ATC before and we both tackled it. I really like them and I see Tee does as well.
Below is a little altered notebook that ties at the side with a pretty image, I will probably tuck this into my purse for those times I need to make a note of something. The tag is a little beach them with cute shells and fish on it. Tee has added some glitz to it here and there. Click on any of the pictures to get a larger version to see all her details
 Here is the ATC easel card and a lovely little envelope it was tucked inside. Isn't that the cutest bird and girl. Tee you did a wonderful job on this. It is going to be displayed on my corner cabinet in the living room.

Next up is a bundle of tea, a Marie ATC and at the bottom are scrabble tiles altered with scrap paper then I think Glossy Accents applied and a magnet on the back. Such a cute idea. They will be put to good use. 

And here is Marie with her hair flipped up and Oh La La underneath, isn't that clever?
 
Last but not least a cute little organza bag filled with lovely flowers and goodies and some papers and a personal note from Tee that really touched my heart. Thank you so much Tee for the lovely swap.


I am finishing up a couple swap items then I am back to painting. I finished up 4 snowmen heads for wreaths (did I tell you that already?) and on to more projects. If I disappear for any length of time you know where I will be but I will try to pop in now and again. I am signing up for another craft show tomorrow so now I have 2 to look forward to.
Thank you for dropping by and never quit discovering what you are capable of doing.
♥♥♥


Friday, August 24, 2012

Paint but mostly paper

OK now that I have your undivided attention. As I told you a few weeks ago I wanted to get an early jump on my fall painting for craft shows. Well I had good intentions and I have been painting a bit but I got a little sidetracked. Sometimes I can't  help myself and I am drawn back to either paper or mixed media.
So here I will show you what I have been up to and will explain along the way. 
First up, another sign with houses on it for sale this fall, think I will do a few more of these and try to put the word Welcome along the bottom. This was a fun and quick pattern to do. I love these signs from the Dollar store although they were 2 dollars but hey, saves buying, cutting and sanding. Price of wood these days this is a good deal as far as I am concerned.
This picture looks a bit bright so you can't see the shading around the edges of the wood and I  shade a lot. Some patterns do not call for shading and if I see something I want to shade, I go for it. I love shading and detail. Just the artist in me I guess.
  Next up is a chunky ATC. I have seen these around blog land and on sites but never tried one. We all know that the standard paper size for ATC's is, 2 1/2x 3 1/2, which this is, but ,it is made out of a cut 2x4. I am not sure why they call them 2x4's because they really aren't if you happen to measure them, which I did ,and, to my luck it was only 3 1/2 inches in width. Anyways I covered the wood block with torn dictionary pages. Painted with washes  of acrylic paint. I stamped some designs using Stazon and added some white gel pen accents. This angel is a recent mini drawing I did. I painted her mostly with watercolours but her face is done with Prismacolour pencil crayons the Suzi Blu way. I have a lot of drawings in my sketch book, some are favourable for art some are not but it is all a learning process for me. I have found if I trace these drawings onto regular white paper as described in Suzi's book, Mixed Media Girls, I lose some of the proportions so I am scanning the images then colouring them. It is still my original drawing but the fun part is I can also make them any size I want. This Chunky ATC is still a WIP but I wanted to show you my progression. 
 And another one of my sketches, I applied to a canvas board background using a faux batik technique I found on Pinterest. You put glue onto the canvas, let it dry. Paint using a minimal number of colours, I chose my fav summer colours this year, lime green and turquoise and the white is the original canvas colour. Then when paint has dried peel up the glue. I added dots with my stylus and white acrylic paint. The large dots are glue and the smaller dots are stylus. This was fun. I just love the background, you should try this. And I did the same thing with the girl except I found in my stash come nice paper for her dress, real lace for the collar cut to fit. Grunge letters I coloured with complimentary colours. I may still bling them up with Stickles, not sure yet. This girl is going somewhere, but I can't say to whom or where yet....it is a secret.
 Another canvas board skinny. I painted her hair with watercolour and just dropped in a tiny bit of blue here and there. This is computer paper I did the girl on so I couldn't soak the paper like w/c paper but I got the job done. I used stencils, acrylic paint, marker, paper, pencil crayons, texture paste so this is truly mixed media and I have so enjoyed it. I found the word "Fraulein"in the dictionary, it jumped out at me,  so,I cut it out and put it on her dress. Rubbed some metallic paint over it to tone down the white paper then traced around it with white gel pen. So much fun. I am in a trade with a girl from Eastern Canada and she got Suzi's book but has not done much drawing yet so I hope I can inspire her to do some more. Once you let go and say I can do this....you will be amazed at what you can accomplish. I know I did. This is not part of our trade just an added something. 
 And I am also into these ATC easel cards. I made a few of them and just can't stop. Mona is printed on canvas paper to give it a more artistic feel. I cut out a frame from black c/s and ran through my Cuttlebug, then I inked it with gold ink heavily. then I made the easel and thought more about what to do. 
See that mini paint brush...I made that. I used a round tooth pic, cut a bit off one end, I cut a tiny piece of foil  duct tape for around the ferrule, then I cut an old paint brush and use the hairs, the brush was toast anyways and I reused the bristles, added some glue then wrapped the tape tightly around and the hairs are in there good. I found some paper gears, and then I looked for a hand charm and glued that on to make it look like Divinci just completed Mona. Behind Mona is a dictionary quote. Oh love how this turned out. Someone is getting this and if she comes by for a visit don't look Amy......
 and here is a close up of the bottom. This took some thinking but I pulled it off and I am so pleased. 

Oh and a bit of news...I was called this week from the librarian of our small local library which I frequent every 3 weeks and have been asked to be their artist of the month. Now this came about because the library organizes the craft show in the community and I left my name, blog addy to check out my work. 
Well the craft show is filled up but they would like me to bring in some artwork of mine to showcase it for this month. Now this month is almost over but hey I am willing so why not. Who knows someone may want to buy or get a look at what I make. I am a little excited
Yippee Skippee dance here.

Well I have some snowmen on my table that are almost done...big BBQ on Sunday with my MIL and it is supposed to be hot and humid again. 
Have a wonderful weekend and thanks for stopping by
♥♥♥

Friday, August 17, 2012

Take a peek

A blogger friend of mine, Tee over at the Altered Paper, received a swap I sent her and in my haste I did not take pics to show on my blog so if you care to take a peek over at her blog just click on her link.
I have not received Tee's swap yet but when I do I will be showing you.
I found in my blog travels ATC easel cards. They are so much fun to make. I emailed Tee to show her and gave her a link to how to make them and then we decided we would do a private trade. I made her 2 even tho we were only to make 1, but, I can't usually stop at one of anything. When I get on a roll I go for it.

I will be trading soon with another blogger friend, Amy Jo, and you never know what will be in the works. Our theme is Divinci inspired for an ATC and the tag we are swapping also is game or game piece inspired.
So between my painting which is going on rather slowly I enjoy stopping and playing with paper now and again.
I also am feeling a little blue as of late. My Auntie Lesley is not doing very well. I pray for her but there is no more the doctors can do . I am so blessed to have met her in person and talked to her over the years on the phone. The miles are too far when it comes to these hard times. I hope she knows I am thinking of her and love her very much.

PS did you notice I have a little buddy on my blog now???? Isn't she the cutest?.Looks like my fat Rosie, as a matter of fact, Rosie will stay with you and follow you around and make sure you feel at home while visiting my blog.
TTFN, ♥♥♥

Friday, August 10, 2012

I'm still here

Hello everyone.
I took a bit of a blog break and got some things done and took some time to visit other blogs which I had neglected while doing my challenges, so please forgive me for my absence.
I am also slowly and I mean slowly starting to paint for the fall. I have got a few things to show you and a couple things I made for myself. I don't generally take any time to make something for "me" but viewing Pinterest lately I thought if I am pinning all this stuff why not put it to good use.

So firstly I will show you what I have been painting. Seems rather fitting since during the month of July everyone was doing a Christmas in July theme as I blogged around. Little did all you know I had the paint flying and brushes just a moving. 
Here are a couple dollar store signs with chains I bought and painted a  couple different snowmen things on them, I have more to paint. I don't generally do more than a couple of one thing, it makes it look like you are buying the only one of this type of item. I don't mass produce larger items like these.

This is a Monika Brint pattern, new this year. It just caught my eye. 
I had to tilt some of my items because it is dreary today and to get the right lighting and no shadows I had to tilt so the shadow would not appear. 
 This is a Renee Mullins design, it was really designed for a window,  the frame in front and it looked like you were peeking out the window ,but, I didn't have any of those and I just thought this would be cute to hang on a wall over the holidays and even over winter. Snowmen live year round in some areas!!!!
 Years ago I painted soaps and the last couple of years I didn't do any. They are quick, easy and very affordable. They usually fly off my table. I have to seal them still but will do that when I get more done. You can even use these soaps and the painting will stay on them til you are done. Most peeps just put them in dishes in their BR over the holidays. The Snow on the bar to the left I put a bit of Stickles to make it sparkle,
and, you can never have enough cats in the house...can you???
 And this....I had to make one after I saw this either on Pinterest or blog land. I can't remember but I do have the link to make one here. How clever, an accordion box for ATC's. This took a bit of paper to make but I have loads to use up so I really enjoyed making this and adding embellies and stamps from trades I have done with peeps from all over. The letters on the front I did in a crackle, I found these in a stash tucked away, they are wood and I wanted something a little on the large size.
 This is one of the sides with a metal butterfly I have had stashed away for some use....I think Becky sent me these a couple years ago, thanks Beck. 
 And this is the inside with the accordion folds. Now I must say, the accordions are tricky to lay in place until you actually put a couple ATC's in . I also have to replace my magnetic closure. It isn't what I wanted so I have to go and get some discs so it snaps shut and flush. I only had strips and they are not really working. I tried Velcro dots but they didn't work for me either. Oh well overall I am so happy and now I can put some ATC's in this and display my little box. 
 And last but not least I saw this while on Pinterest and thought what a cute idea. I was recently given some buttons from my MIL's friend. She got them for free but was destashing and thought I could use them. So I picked out a number of white or I guess clear buttons and there were a few copper like ones as well. I bought a length of chain for next to nothing and made this bracelet and another charm  one. I don't generally wear a lot of jewellery but this just caught my eye. It will go with jeans or semi casual and I bet it will get noticed at craft shows. What do you think? So I have put Pinterest to some use. 
Thank you for looking and I would love for you to comment.
Do you get inspired from Pinterest? I know I do even if it is just to look at and spark some ideas of your own.
Til next time....TTFN and stay crafty
♥♥♥
Related Posts Plugin for WordPress, Blogger...